Nursery Accent Walls to Keep Baby Calm
Did you know that the colors and patterns you choose can influence how your baby feels? Babies are surprisingly sensitive to their surroundings, and their nursery plays a big role in setting the mood.
- Soothing Colors for Sweet Dreams
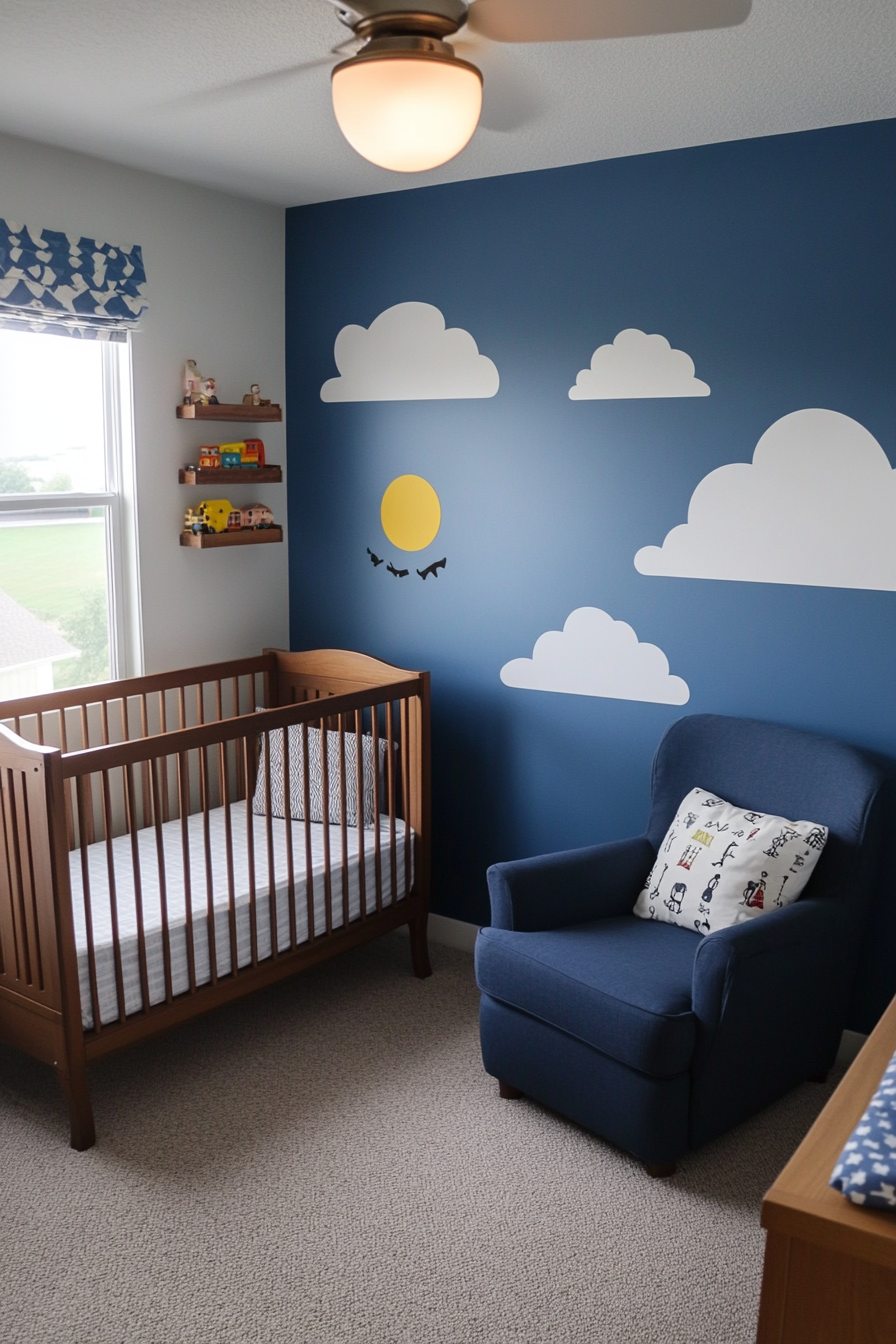
Soft blues, gentle greens, and muted pastels can help create a calming environment. These shades are perfect for lulling your little one to sleep. - Energetic Designs for Playtime
On the other hand, brighter hues like yellows and oranges might add a playful energy. They’re great if the nursery doubles as a play space, but use them sparingly to avoid overstimulation.
What Materials Work Best for Nursery Walls?
Safety and practicality come first when designing a nursery. Babies are curious creatures, and their environment should be as safe and baby-proof as possible.
- Go for Non-Toxic, Low-VOC Paints
Traditional paints can release harmful chemicals into the air. Opt for eco-friendly options to ensure your baby’s safety. - Choose Durable and Easy-to-Clean Surfaces
Little hands tend to leave smudges and fingerprints everywhere! Look for washable paint finishes or consider adding wall decals that are easy to wipe clean.
Can Accent Walls Grow with Your Child?
Your baby won’t be a baby forever, which makes it smart to think ahead. A well-designed accent wall can transition beautifully from a nursery to a toddler room and beyond.
- Timeless Designs Over Trendy Choices
A classic mountain silhouette or a soft ombré gradient can remain stylish as your child grows. - Add Personalization That’s Easy to Update
Consider using peel-and-stick decals or framed artwork that can evolve with your child’s interests. Swapping out a design element is far easier than repainting the whole wall!
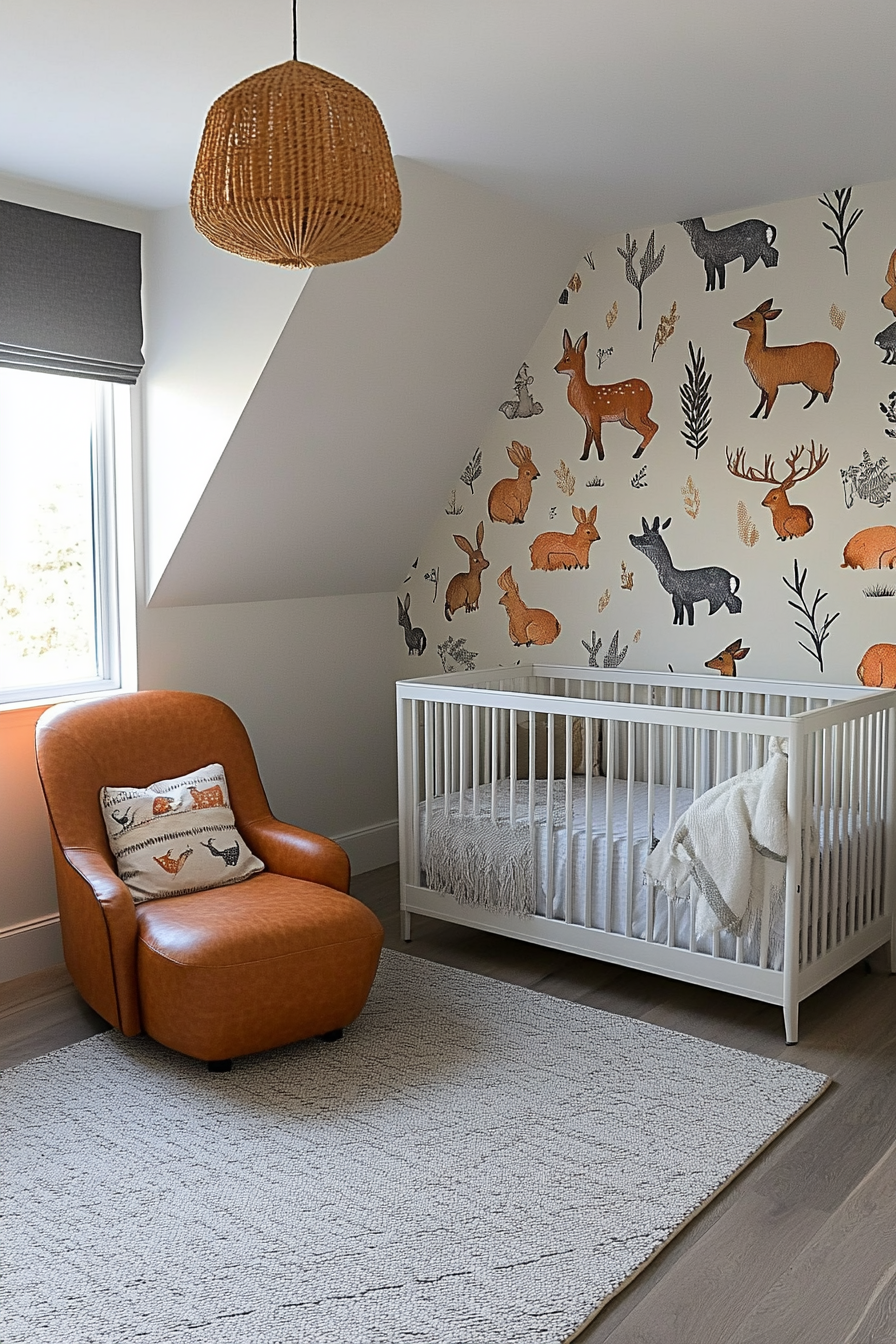
1. Whimsical Forest with Playful Animal Decals
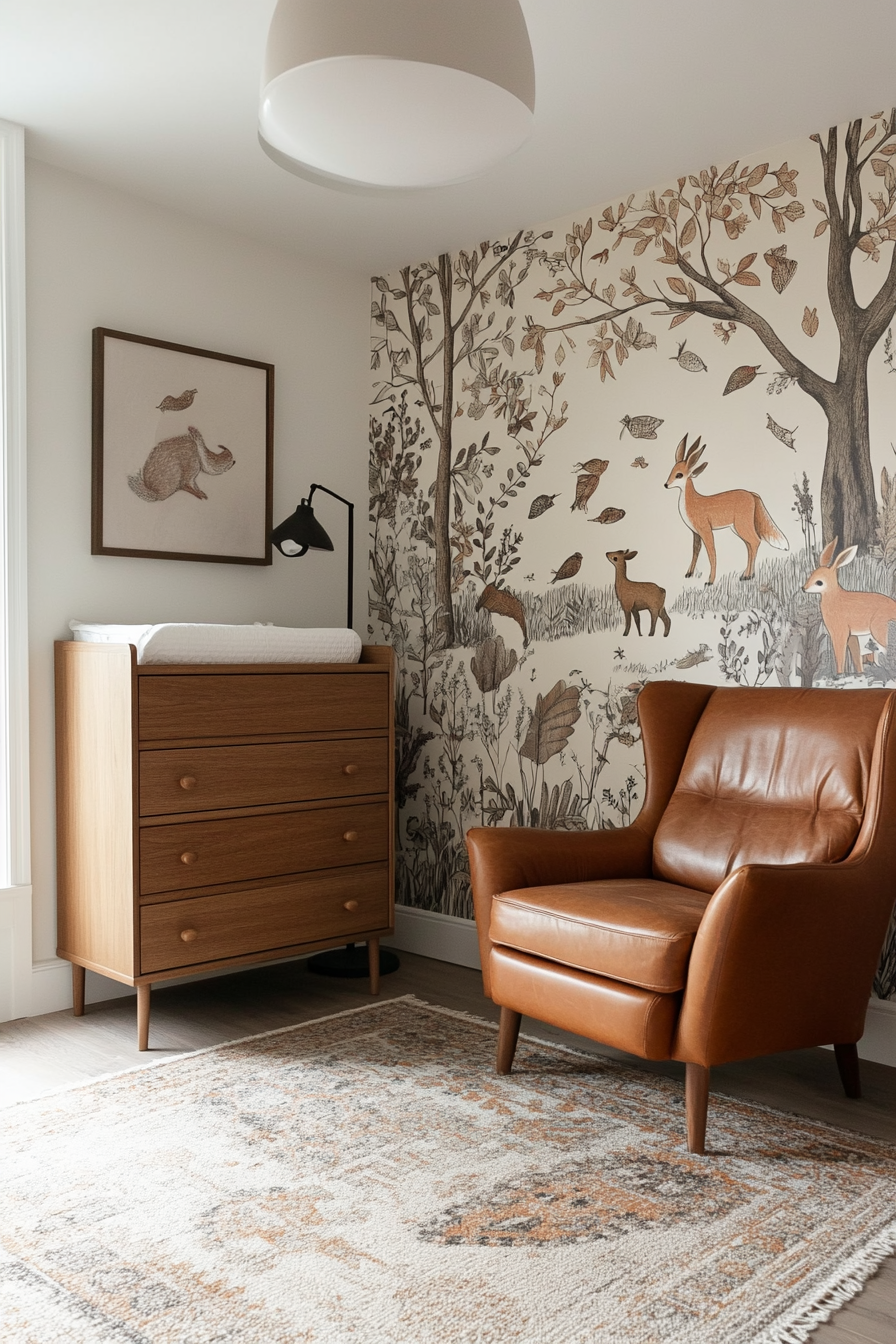
Why It Works
This accent wall idea brings the magic of the outdoors right into your little one’s room. By featuring friendly animals like foxes, deer, and rabbits tucked among whimsical trees and greenery, you create a playful, storybook atmosphere. It works because it combines color, nature, and imagination all in one space—perfect for sparking curiosity. You can scale the design up or down depending on how much of a woodland vibe you want, and use decals for a low-commitment, peel-and-stick solution.
How to Implement
A. Choose Your Forest Theme
- Focus on Color Palette: Select soft greens and browns for a calm environment or brighter hues for extra vibrancy.
- Placement of Decals: Arrange the animals at child’s eye level so they can interact visually with the designs.
B. Mix in Trees and Foliage
- Vary Sizes: Use taller tree decals behind smaller shrubs to add depth.
- Layering Technique: Overlap some leaves or branches to make the scene look more organic and less flat.
C. Add Decorative Details
- Incorporate Woodland Elements: Mushrooms, acorns, or cute butterflies can fill gaps and create a cohesive landscape.
- Coordinate with Room Decor: Match bedding or curtains with the forest color scheme for a harmonious look.
Styling Tip
For a sweet finishing touch, hang a small faux branch shelf below the decals to display soft toys or woodland-themed books.
2. Soft Pastel Ombré Gradient for Calm Vibes
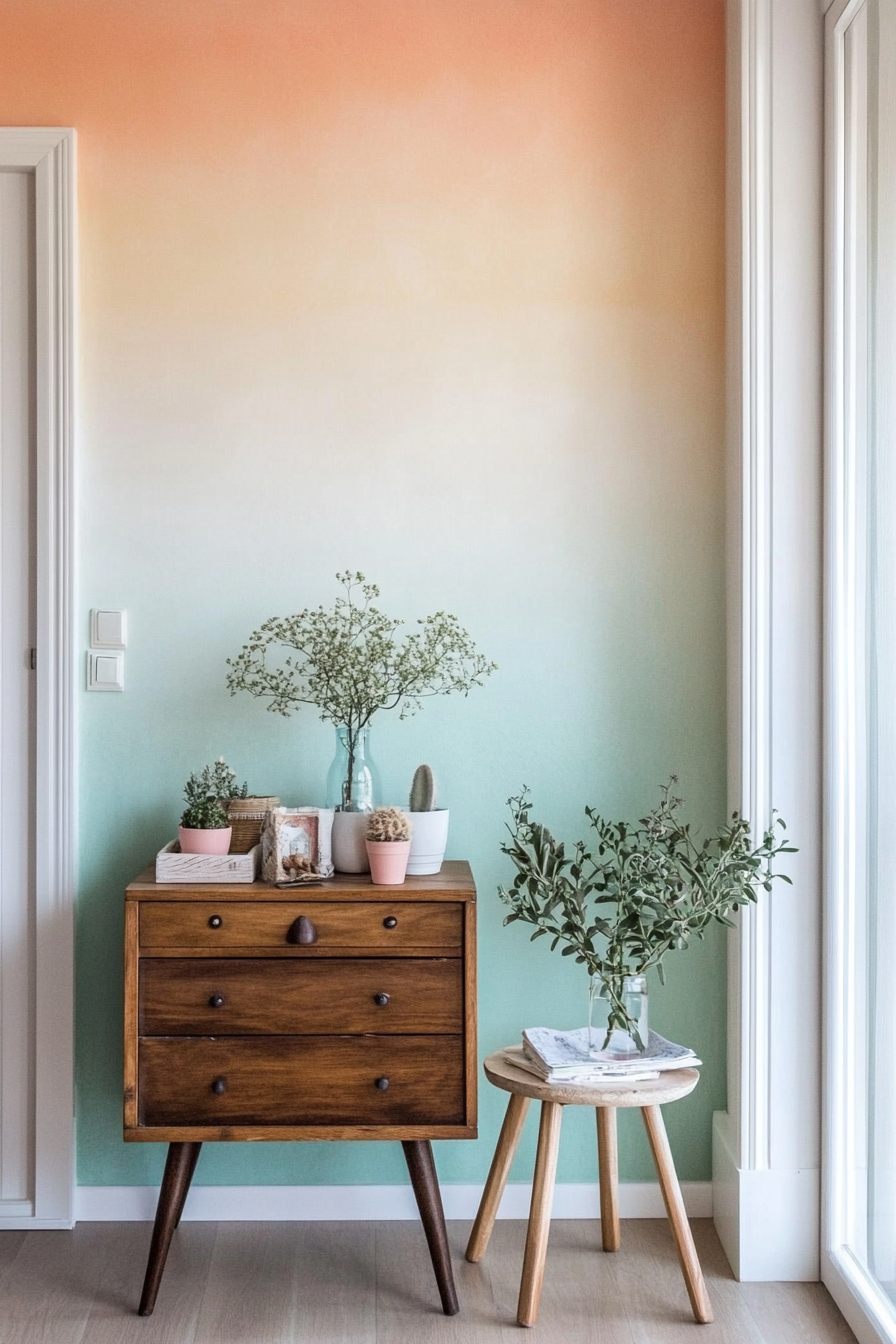
Why It Works
An ombré gradient softly shifts from one delicate color to another, creating a visually calming effect. In a nursery, it sets the tone for rest and relaxation, perfect for nap time. It’s a stylish and modern choice that can be customized with any pastel you like—think blush, mint, baby blue, or lavender. The soft fades are forgiving, and you don’t need to be a pro painter to achieve a charming result.
How to Implement
A. Select Your Palette
- Complementary Pastels: Pick two or three shades that blend well, such as mint green fading to pale yellow.
- Test Swatches: Always paint small patches first to ensure you like how the colors shift together.
B. Blend Gradually
- Use a Damp Sponge or Brush: Work gently where the colors meet for a smoother gradient.
- Work in Sections: Focus on one horizontal band at a time to keep your blending consistent.
C. Finishing Touches
- Seal with a Matte Finish: A matte topcoat can help the transition look soft and dreamy.
- Coordinate with Decor: Match crib bedding or accessories to the lightest or darkest hue of your gradient.
Styling Tip
Balance the delicate wall colors with crisp white furniture or pale wood tones to maintain a bright and airy feel.

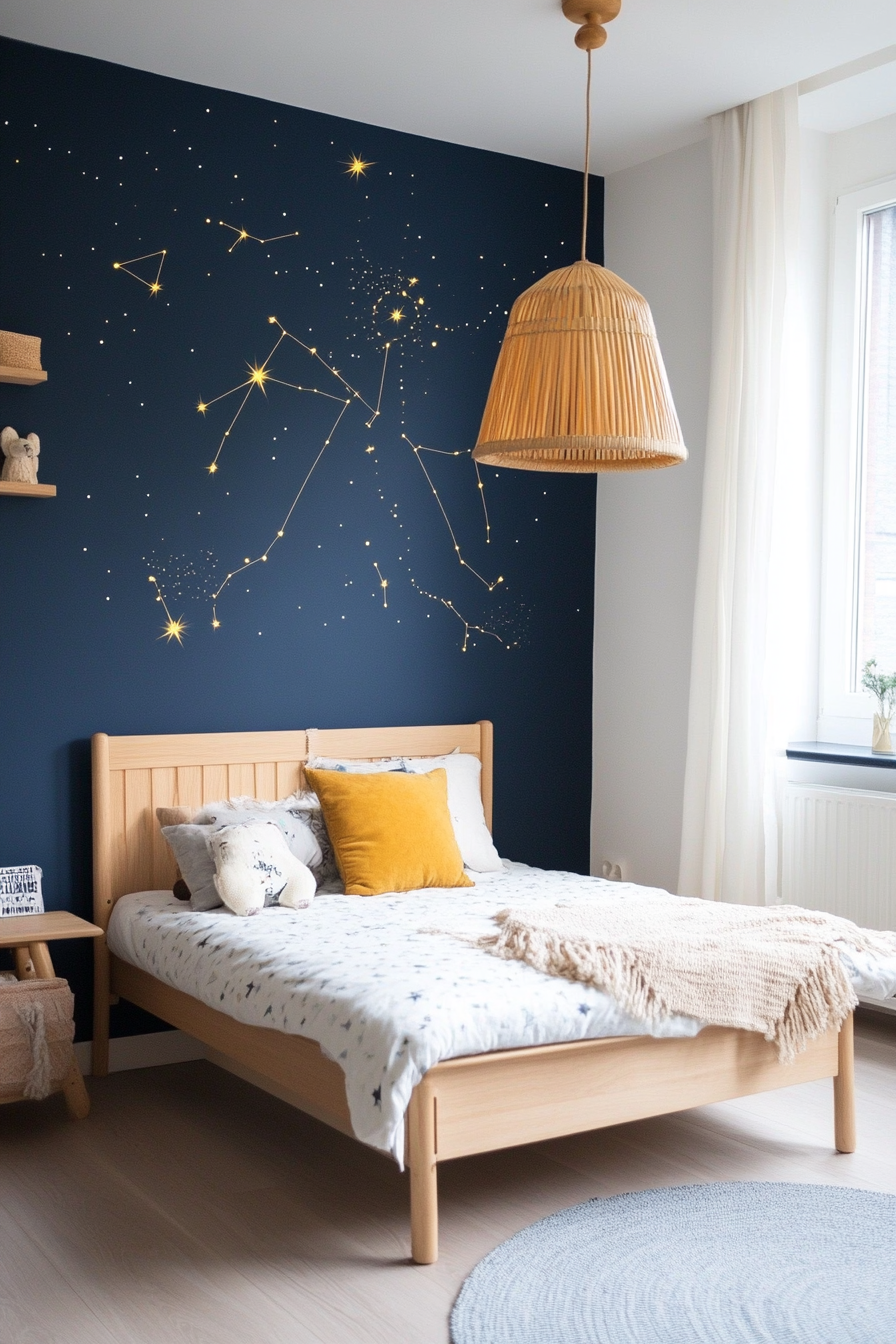
3. Starry Night Sky with Glowing Stars
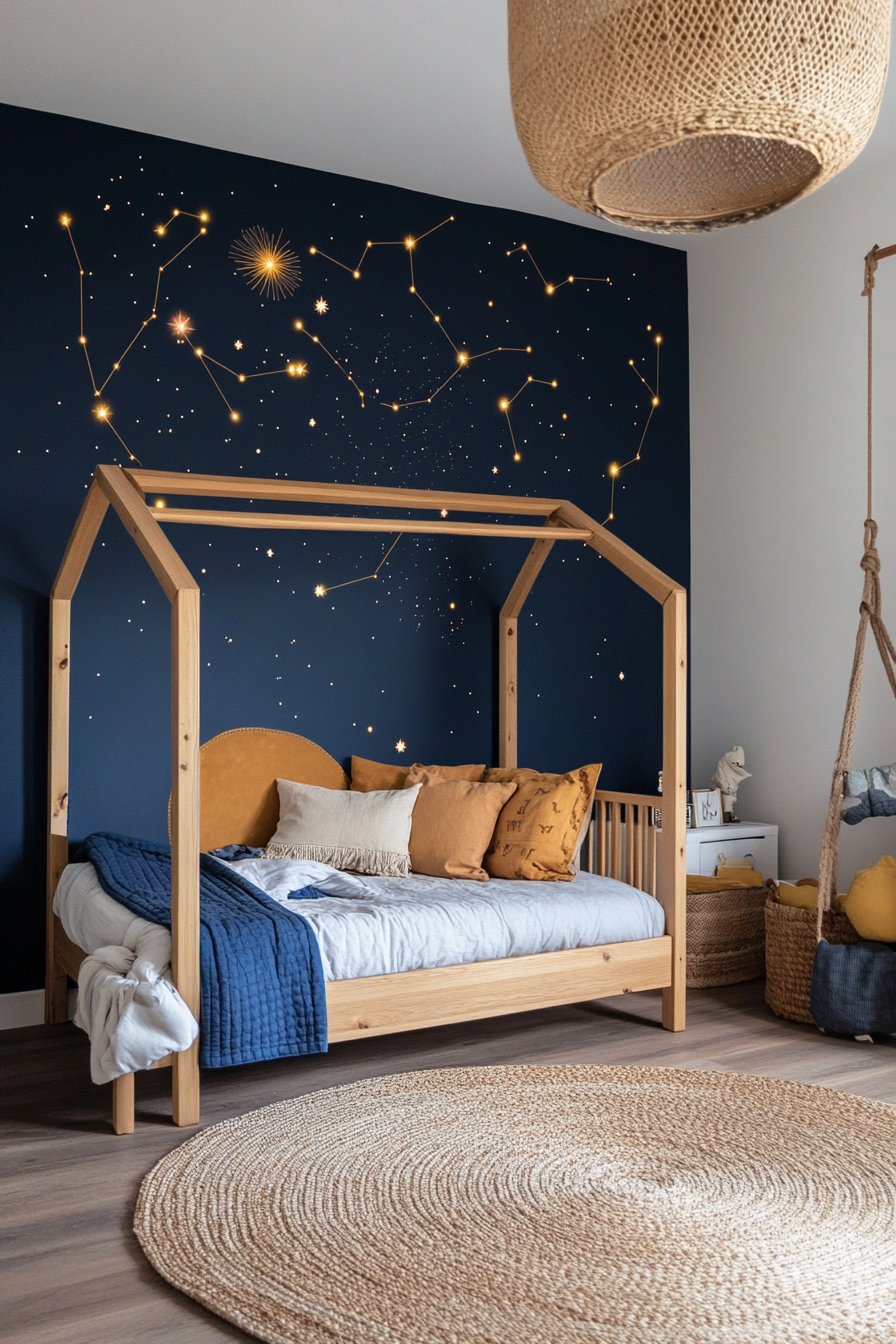
Why It Works
Transform the nursery into a tranquil cosmic retreat by painting or applying decals of a midnight sky filled with twinkling stars. This theme creates a soothing bedtime environment and gently introduces astronomy to your child. Glow-in-the-dark or reflective star stickers add an extra layer of nighttime magic, helping your little one drift off to sleep under a gentle constellation display.
How to Implement
A. Base Color Selection
- Deep Blue or Navy: A darker hue makes stars pop, but you can also use a dusty purple for a softer look.
- Gradual Color Shift: Create a subtle gradient from dark to slightly lighter near the ceiling to mimic natural sky depth.
B. Placing the Stars
- Use Decals or Paint: Stickers are easy to rearrange, while painted stars offer a more artistic touch.
- Focus on Constellations: Try including real constellations like the Big Dipper or Orion for a subtle educational element.
C. Glow-in-the-Dark Effects
- Layer Different Star Sizes: Larger stars closer to the bed, smaller ones higher up.
- Test the Glow: Charge the glow paint or stickers with light before bedtime so they remain luminous.
Styling Tip
Accent the sky theme by adding star-patterned curtains or a moon-shaped night light for added bedtime magic.
4. Minimalist Geometric Shapes in Soft Hues
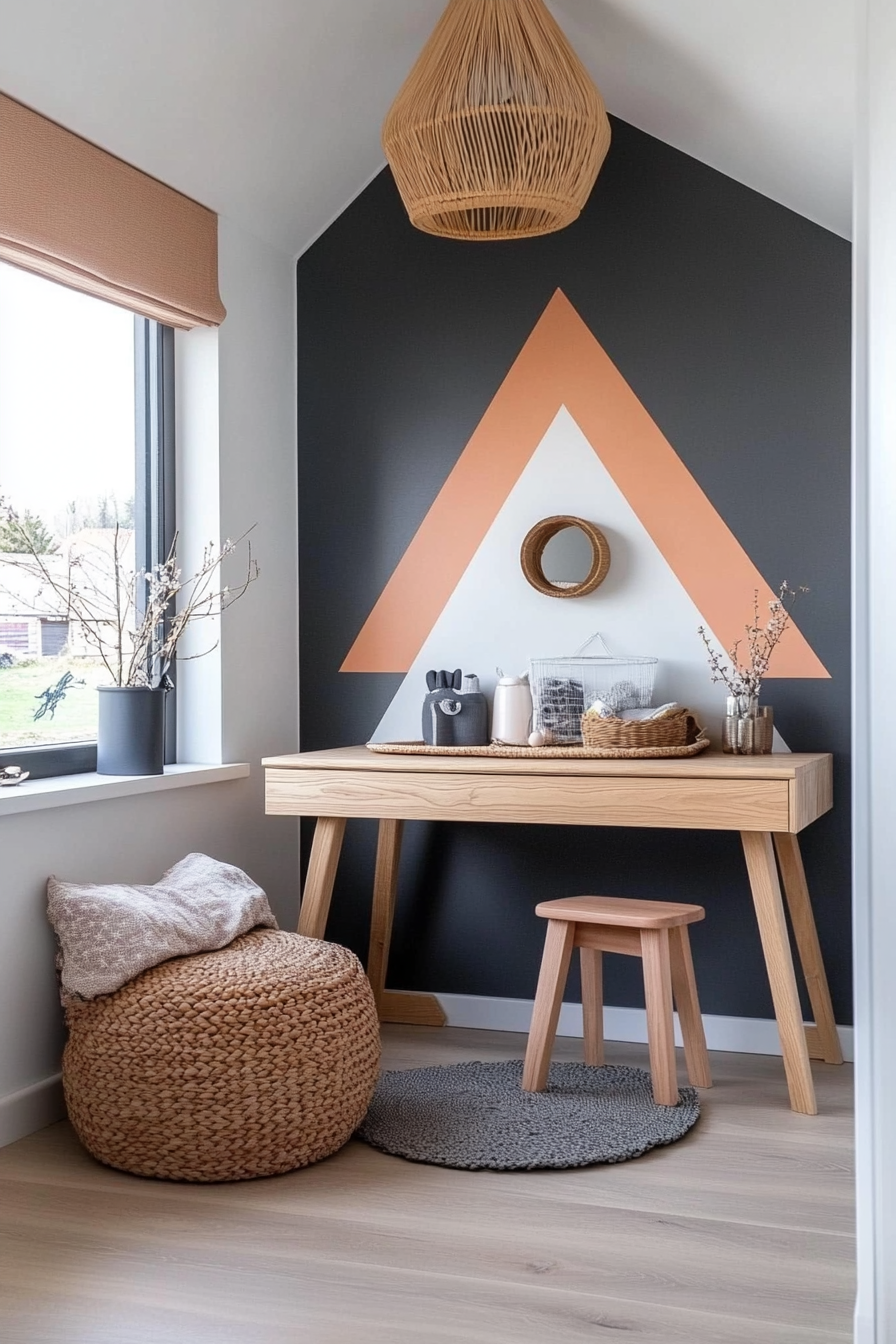
Why It Works
A minimalist geometric wall is a stylish choice that still feels playful thanks to soft pastel or neutral shades. Circles, triangles, and arches in gentle tones create visual interest without overwhelming the space. This approach is versatile, growing with the child, and works well for gender-neutral nurseries. By focusing on streamlined shapes, you maintain a fresh, modern look that’s easy to coordinate with other decor pieces.
How to Implement
A. Decide on Shape Patterns
- Consider Scale: Larger shapes can make a bold statement, while smaller shapes create a subtle backdrop.
- Stick to a Simple Palette: Two to three colors keep the design cohesive and calm.
B. Map Out the Wall
- Use Painter’s Tape: Mark off shapes to ensure clean, crisp edges.
- Experiment with Layout: Place shapes randomly or in a repeating pattern, depending on your style.
C. Keep It Balanced
- White Space is Key: Leave enough open wall area so the design feels light and airy.
- Minimal Accents Elsewhere: Let your accent wall shine by keeping furniture and decor simple.
Styling Tip
Bring in a geometric-patterned rug or throw pillow that mirrors one of the shapes for a harmonious look.

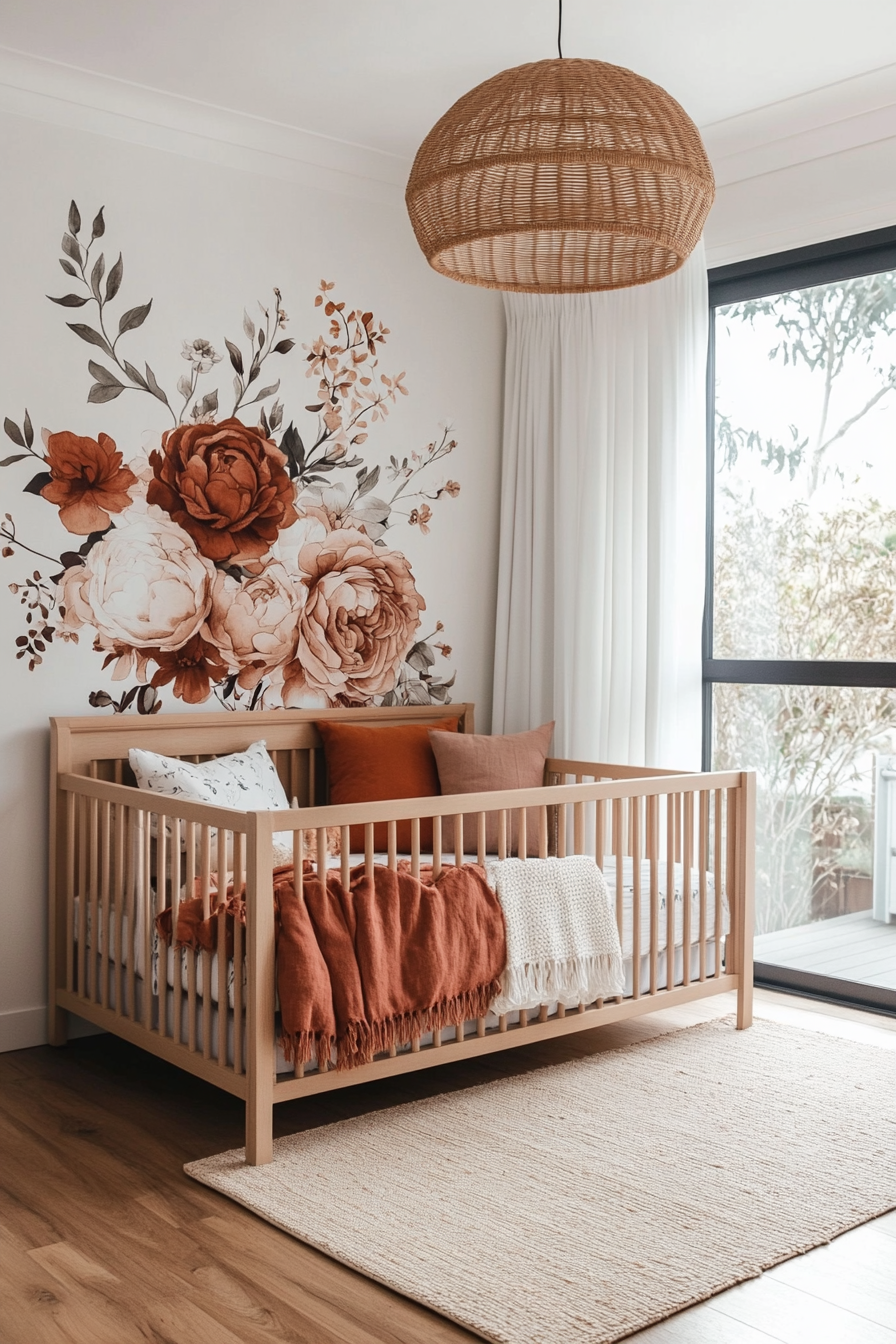
5. Bold Floral Mural with Vintage Charm
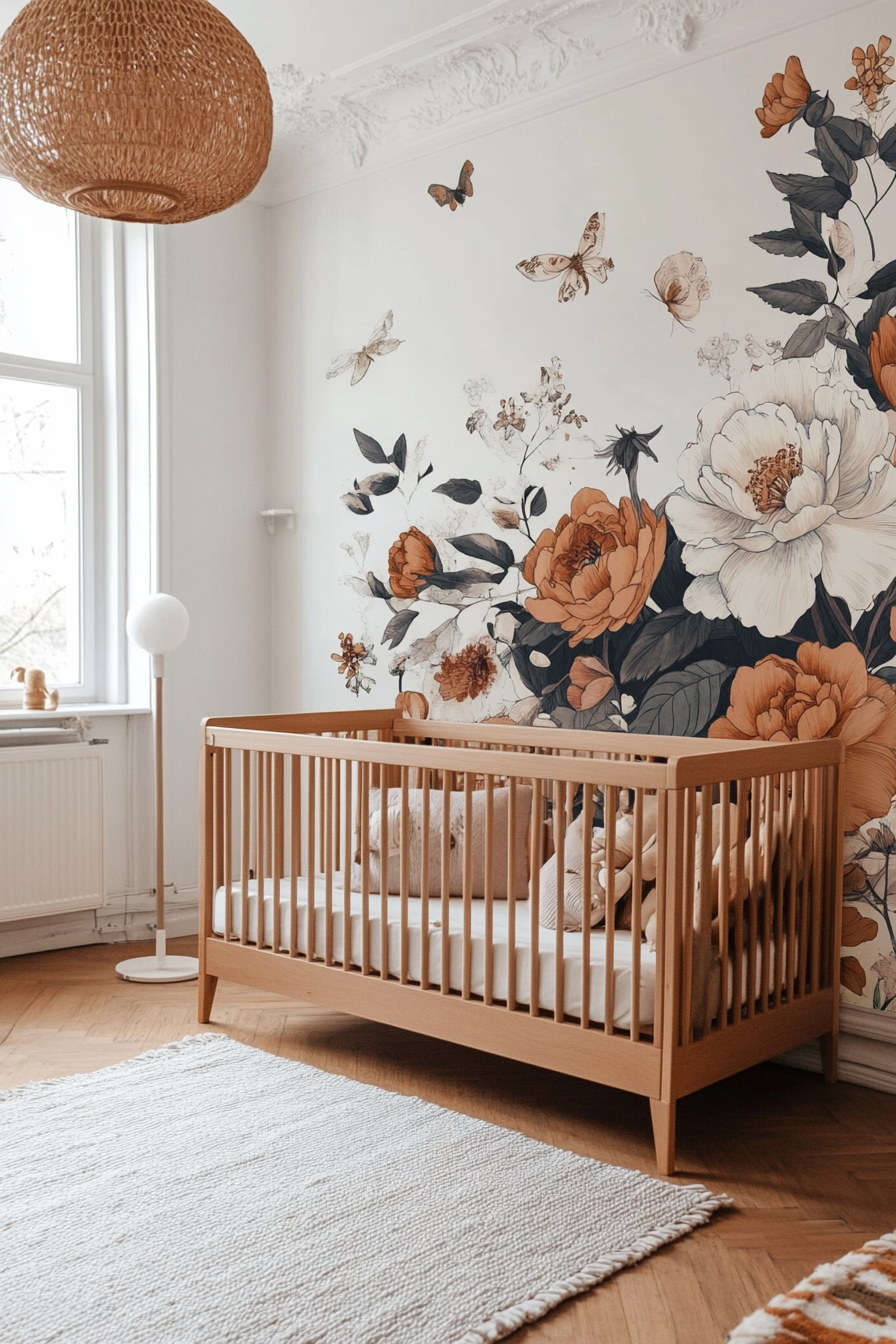
Why It Works
A beautifully rendered floral mural brings timeless elegance and warmth to a nursery. Opt for a vintage look with oversized roses, peonies, or wildflowers in muted tones. This design offers a whimsical fairy-tale feel, perfect for inspiring daydreams. Whether you choose a wallpaper mural or hand-paint your flowers, the delicate blooms provide a sweet, nature-inspired space for bonding and nurturing.
How to Implement
A. Mural vs. Wallpaper
- Wallpaper Mural: Choose high-quality prints for a quick and professional-looking installation.
- Hand-Painted Details: For a personal touch, add a few hand-painted leaves or buds yourself.
B. Arrange the Blooms
- Focus on Composition: Cluster flowers in corners or create a framed arrangement around the crib.
- Play with Scale: Mix large and small blooms to add depth and interest.
C. Consider the Color Palette
- Soft, Muted Hues: Go for dusty pinks, creams, and sage greens for an antique vibe.
- Touches of Gold: Metallic accents can enhance the vintage feel.
Styling Tip
Complement the mural with lace curtains or ruffled crib bedding to amplify the romantic, old-world charm.
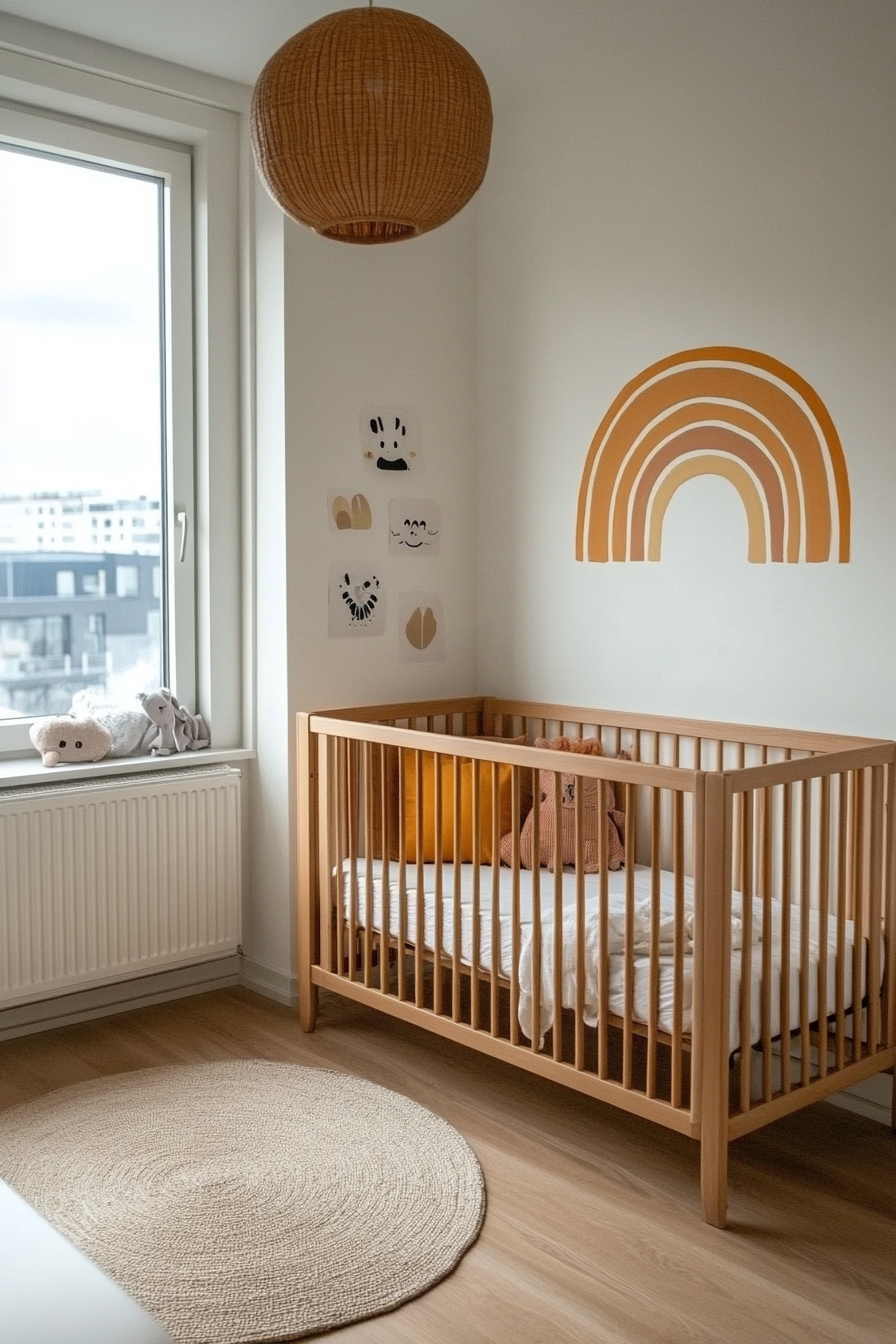
6. Hand-Painted Rainbow Arches for a Cheerful Look
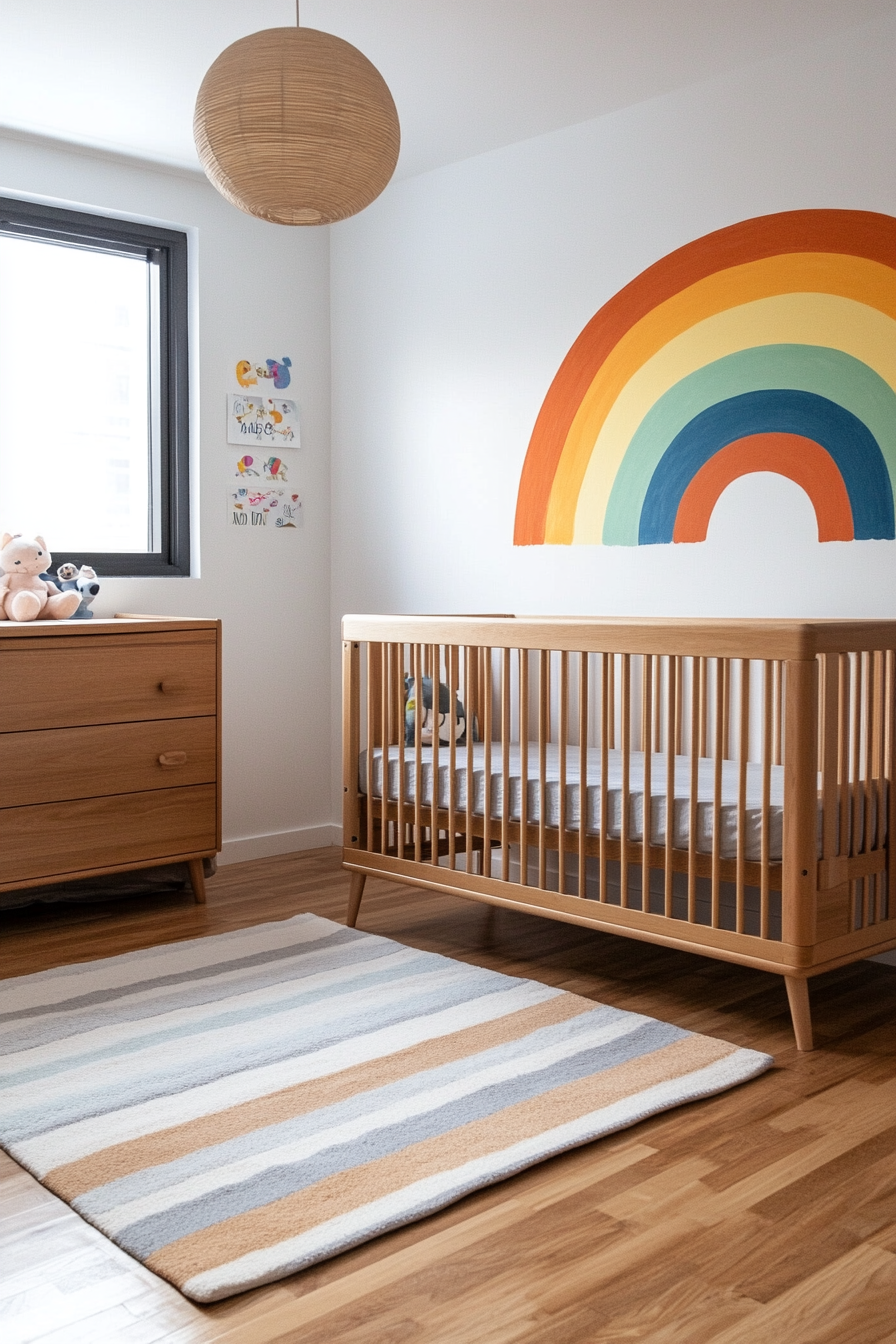
Why It Works
Nothing says joy quite like a rainbow. Hand-painted arches can be as bright or as subtle as you like, instantly creating an uplifting atmosphere. It’s a simple way to add color without covering the entire wall. Rainbows symbolize hope and positivity, perfect sentiments for a newborn’s space. Plus, it can easily tie in with other cheerful elements, such as cloud pillows or star mobiles.
How to Implement
A. Plan Your Arch Layout
- Single or Multiple Rainbows: A single oversized arch can make a statement, or multiple smaller arches can bring playful variety.
- Outline First: Sketch the rainbow lightly with chalk or pencil to guide your painting.
B. Choose Colors
- Soft vs. Bold: Pastel arcs for a calming vibe, bold arcs for extra pop.
- Coordinate with Nursery Decor: Tie the rainbow colors to existing curtains, rugs, or art.
C. Painting Tips
- Use Quality Brushes: Fine-tipped brushes help in outlining, while wider brushes fill in arches smoothly.
- Allow Dry Time: Let each color dry before moving on to avoid smudges or bleeding colors.
Styling Tip
Layer rainbow-inspired throw pillows or blankets for a consistent, joyful theme without overwhelming the space.
7. Dreamy Cloudscape in Soothing Neutral Tones
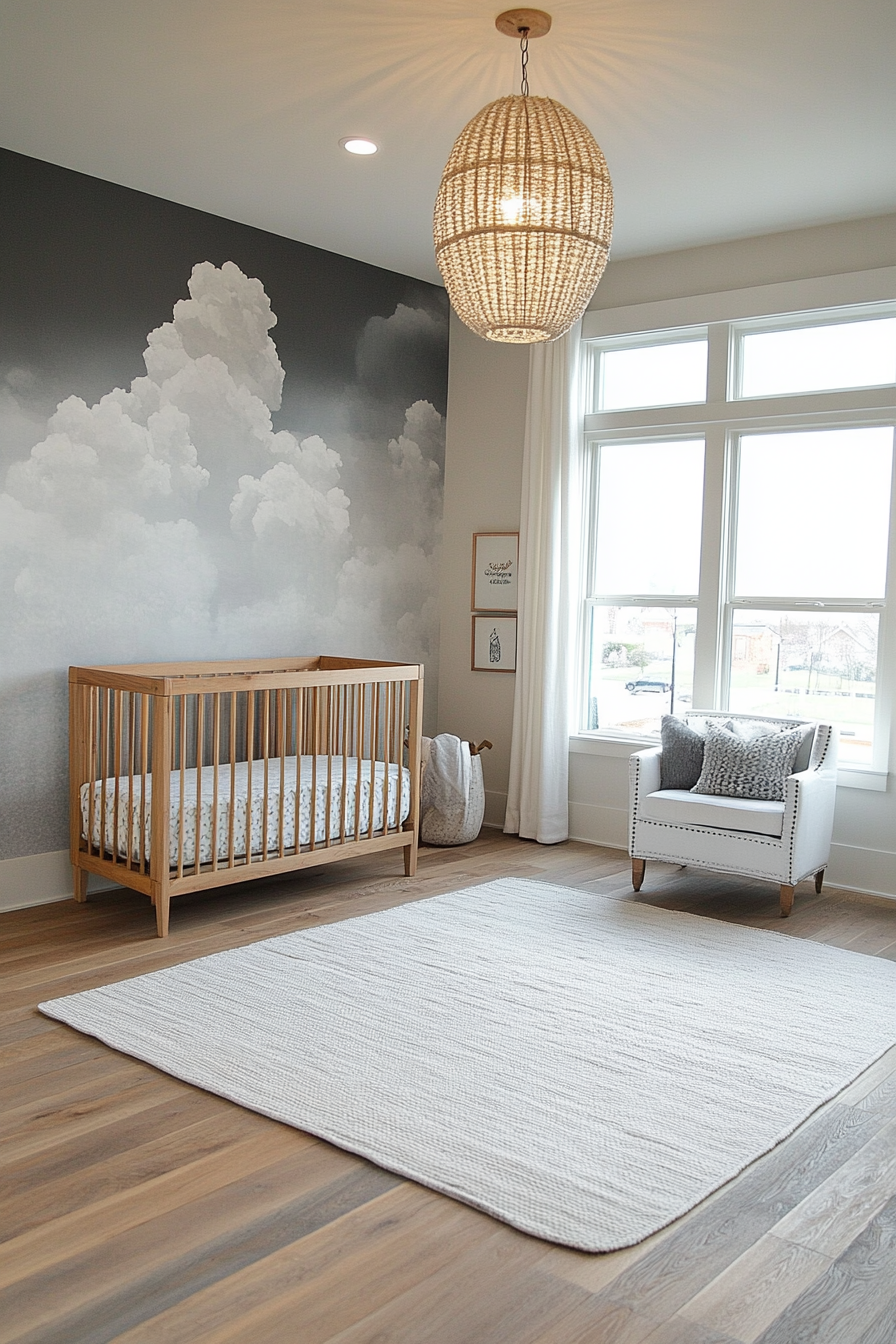
Why It Works
A calm, cloudy sky in gentle neutrals sets the stage for a relaxing nursery. This theme pairs well with just about any color scheme and decor style, making it a versatile choice. The billowy clouds give off a serene feeling, encouraging rest and imaginative dreaming. It’s also gender-neutral and can be easily adapted as your child grows, by adding or removing small playful elements like birds or hot-air balloons.
How to Implement
A. Select Your Neutral Range
- Whites and Grays: Vary the shades to differentiate between different cloud layers.
- Consider Soft Taupes: For a warmer version, mix in subtle tan or beige undertones.
B. Cloud Formation
- Freehand Painting: Lightly shade the edges of the clouds to create a realistic, fluffy appearance.
- Stencil Option: Use cloud stencils for consistent shapes if you’re not comfortable painting freehand.
C. Extra Touches
- Subtle Sparkles: Add tiny dots of reflective paint to mimic silver linings.
- Layer Clouds: Overlap them at different heights for a dimensional, floating effect.
Styling Tip
Hang lightweight sheer curtains to let natural light in and create the illusion of drifting clouds across the walls.
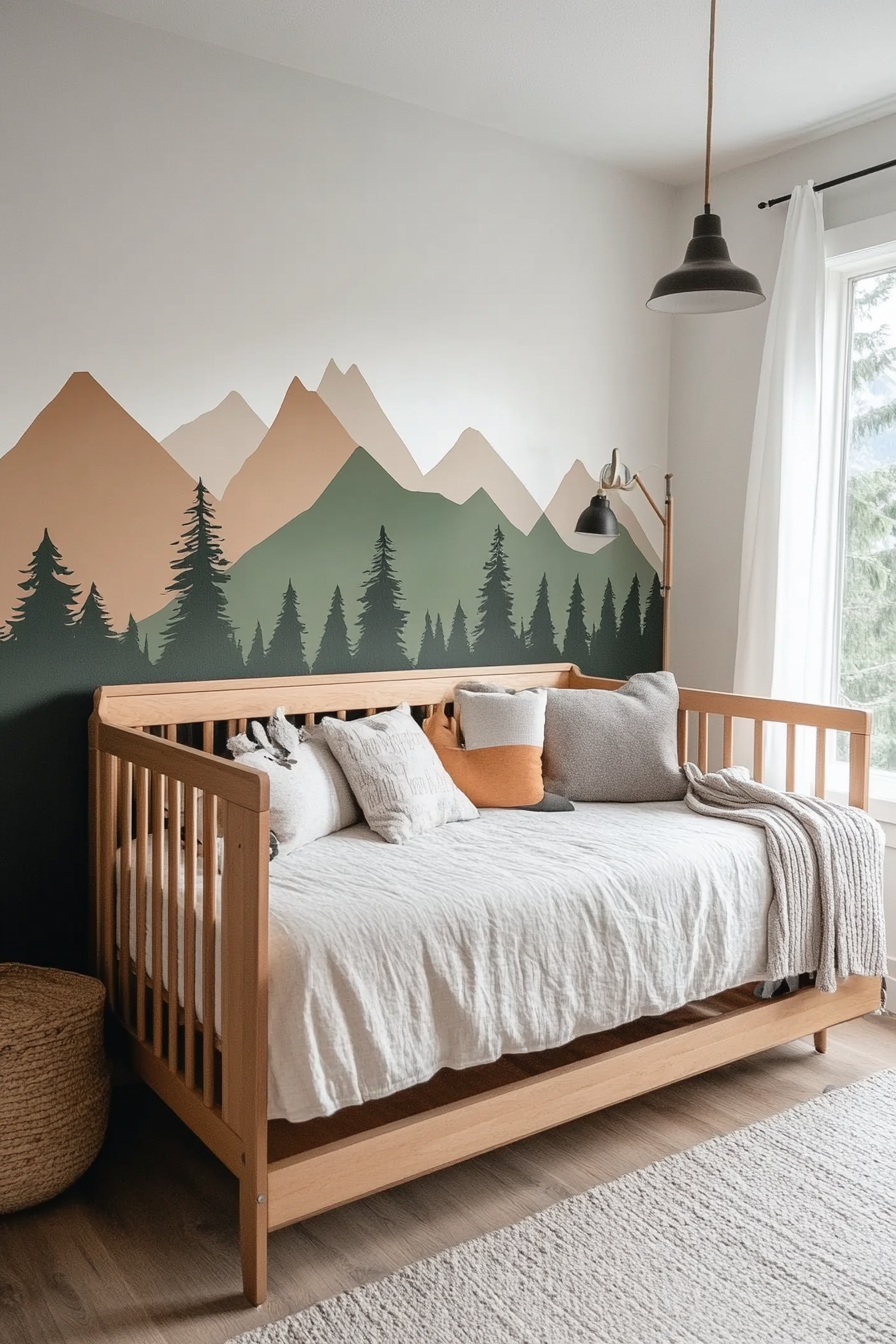
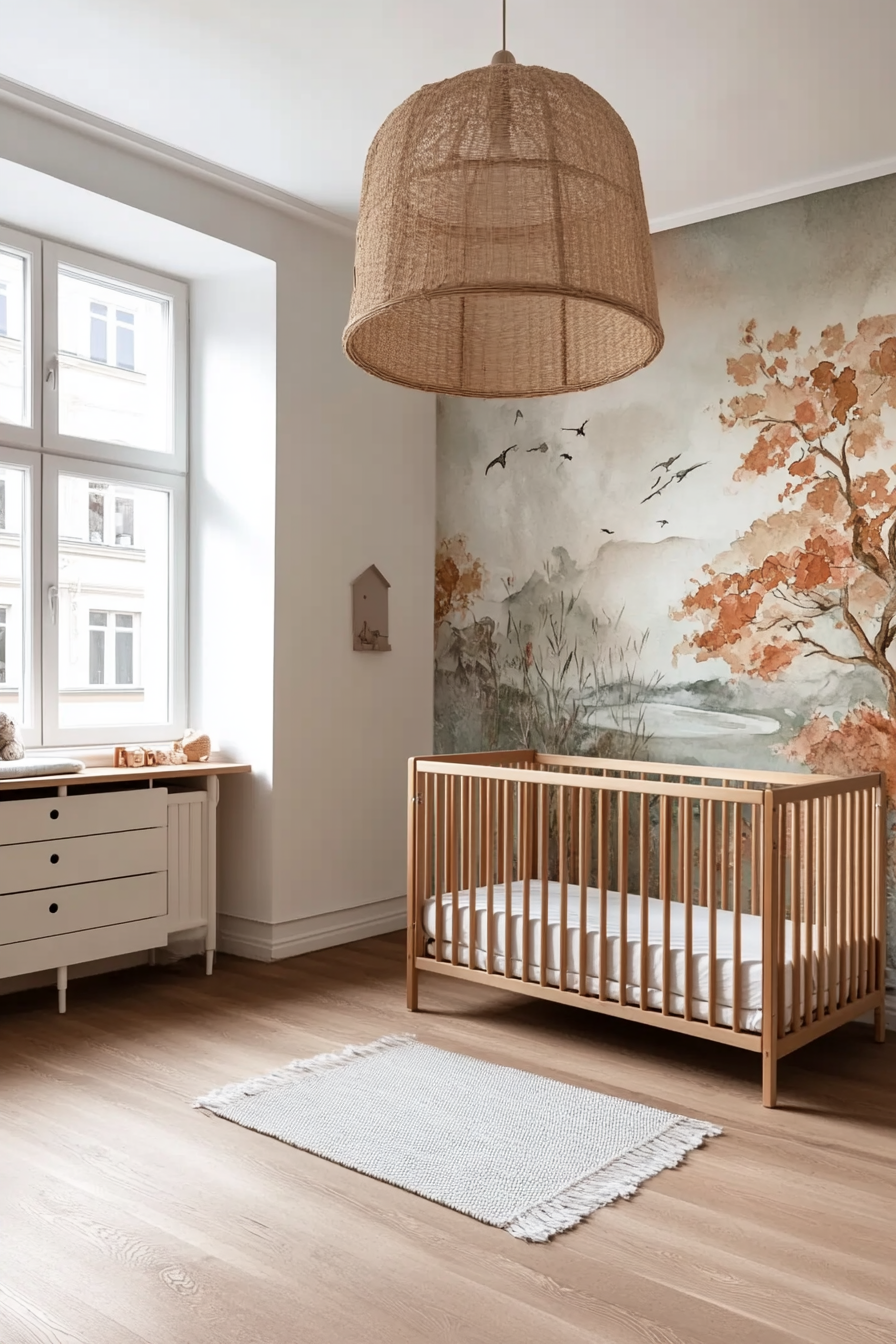
8. Mountain Range Silhouette in Earthy Colors
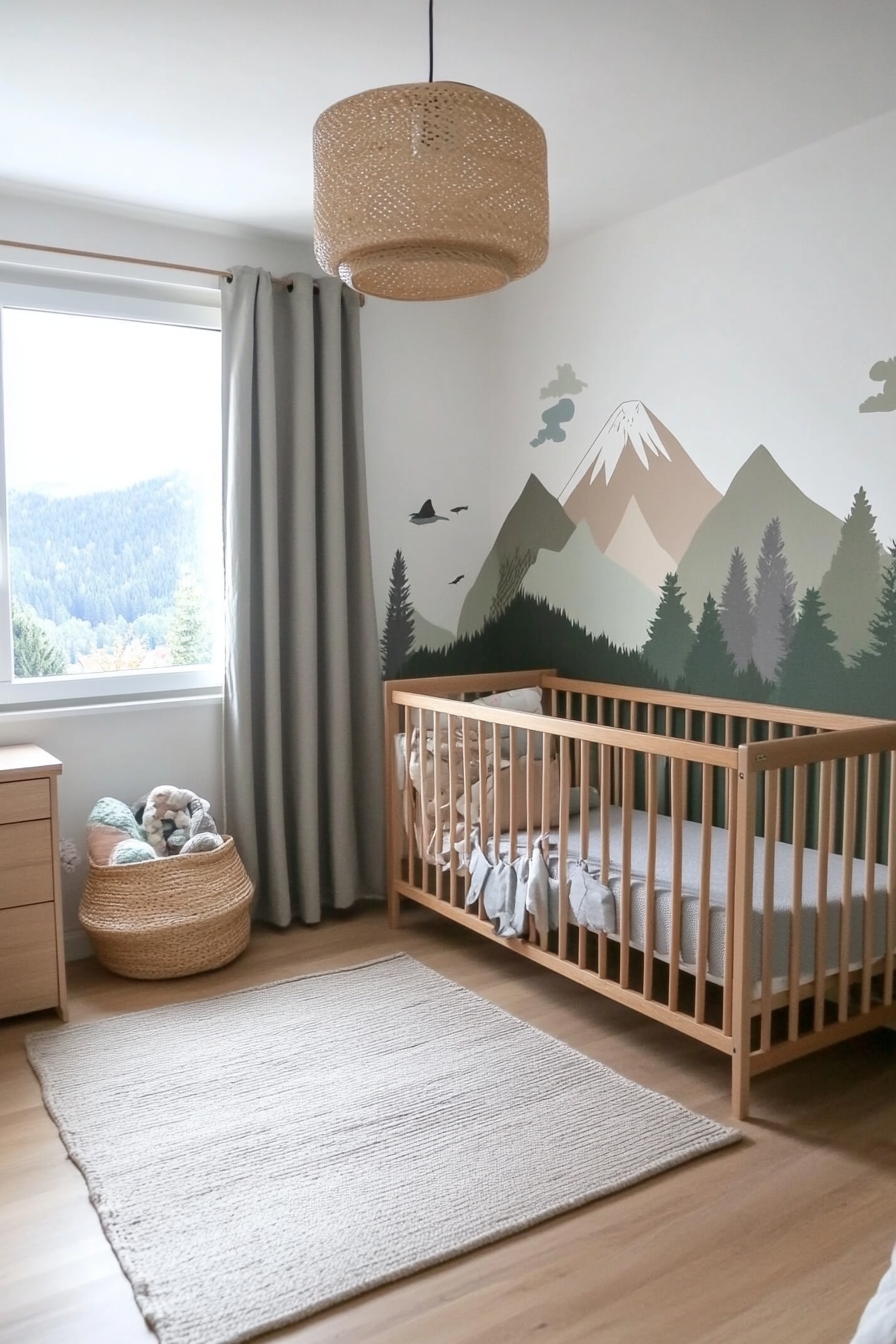
Why It Works
Painting a soft mountain silhouette creates an adventurous and nature-inspired atmosphere without feeling too busy. Earthy hues like muted greens, browns, and greys add warmth and can evoke a sense of outdoor exploration. This design can also transition seamlessly as your child grows, making it a practical and lasting option. It’s minimalistic yet visually striking, bringing a calm, rugged beauty to the nursery.
How to Implement
A. Plan Your Layers
- Use Gradients: Paint each layer slightly lighter or darker for depth.
- Sketch First: Outline mountain shapes in pencil to visualize your final composition.
B. Choose Earth Tones
- Neutral Palette: Grays and taupes keep it sophisticated.
- Pop of Color: Add a subtle green for a fresh, natural touch.
C. Smooth Transition
- Use Blending Techniques: Gently blend between peaks to soften lines if desired.
- Finish with a Matte Sealer: This ensures the mountain silhouettes remain crisp and protected.
Styling Tip
Incorporate wooden elements, like a rustic crib or shelves, to complement the earthy mountain backdrop.
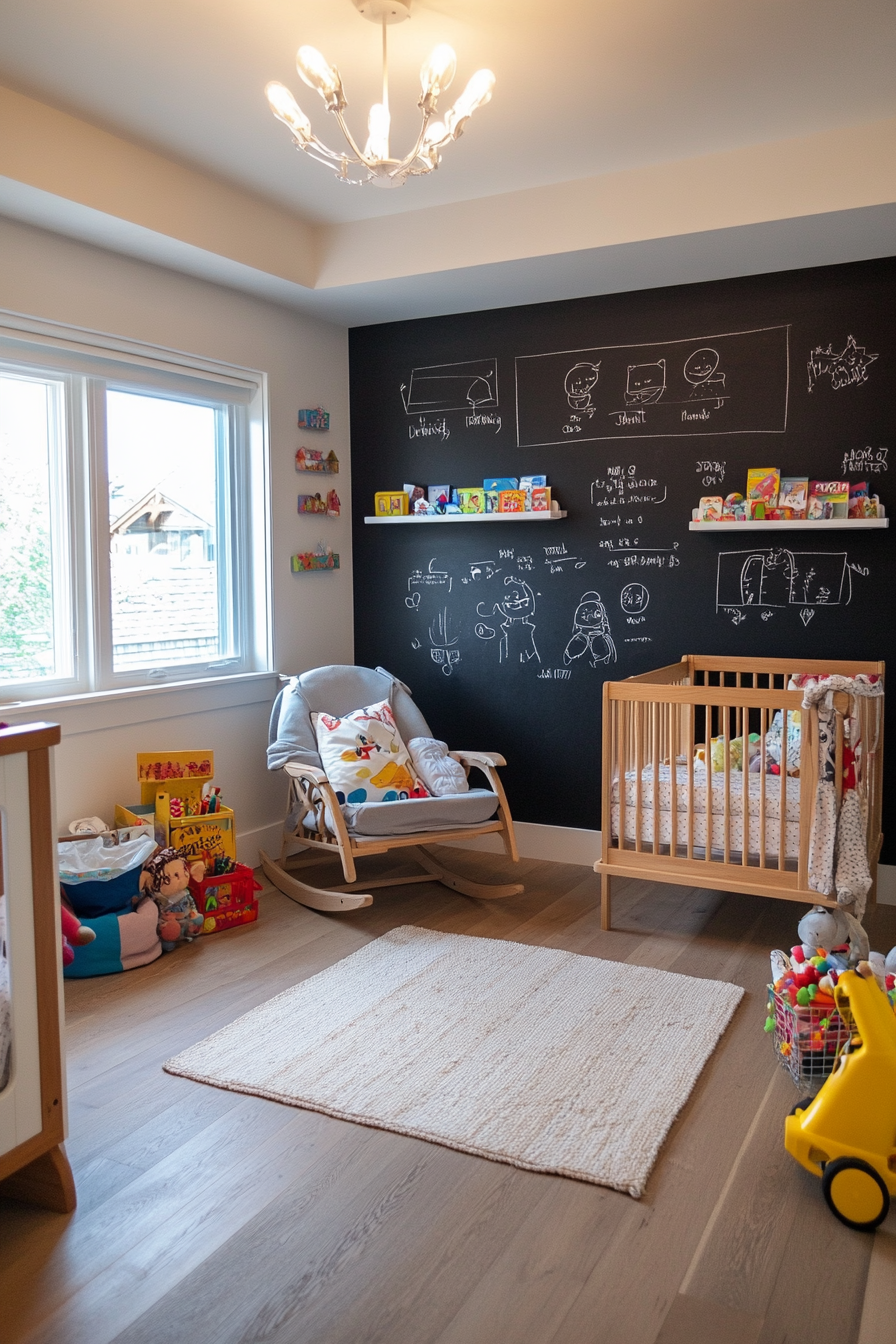
9. Interactive Chalkboard Wall for Creative Play
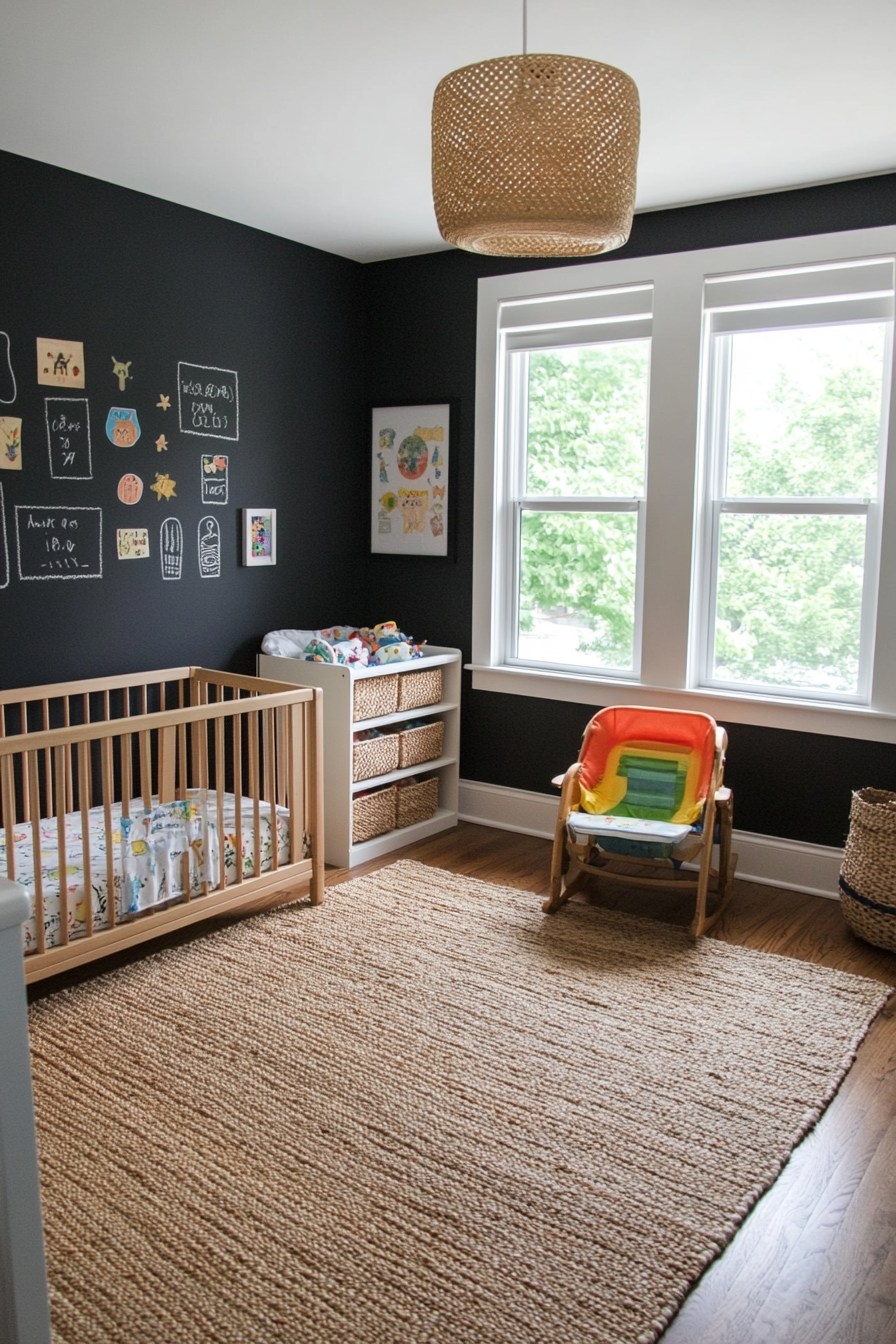
Why It Works
A chalkboard accent wall isn’t just for older kids—it can be a fun element even in a nursery. Parents can write sweet messages, track milestones, or doodle fun designs. As your child grows, they’ll have a blank canvas for drawing and learning. It’s also easy to refresh by simply wiping away old chalk. You can opt for traditional black chalkboard paint or a lighter, colored version to maintain a softer nursery vibe.
How to Implement
A. Prep the Wall
- Smooth Surface: Patch any holes and sand the wall for the best chalkboard effect.
- Use Chalkboard Paint: Apply multiple coats for durability, letting each coat dry completely.
B. Accessorize
- Magnetic Primer: Consider a magnetic undercoat so you can also attach magnets and photos.
- Chalk Storage: Hang a small basket or ledge for chalk and erasers within adult’s reach.
C. Maintenance
- Condition the Surface: Rub a side of chalk all over the wall then erase to prevent ghosting.
- Regular Cleaning: Wipe down with a damp cloth to remove residue and keep it fresh.
Styling Tip
Frame part of the chalkboard area with a simple wooden border for a polished, art-like presentation.
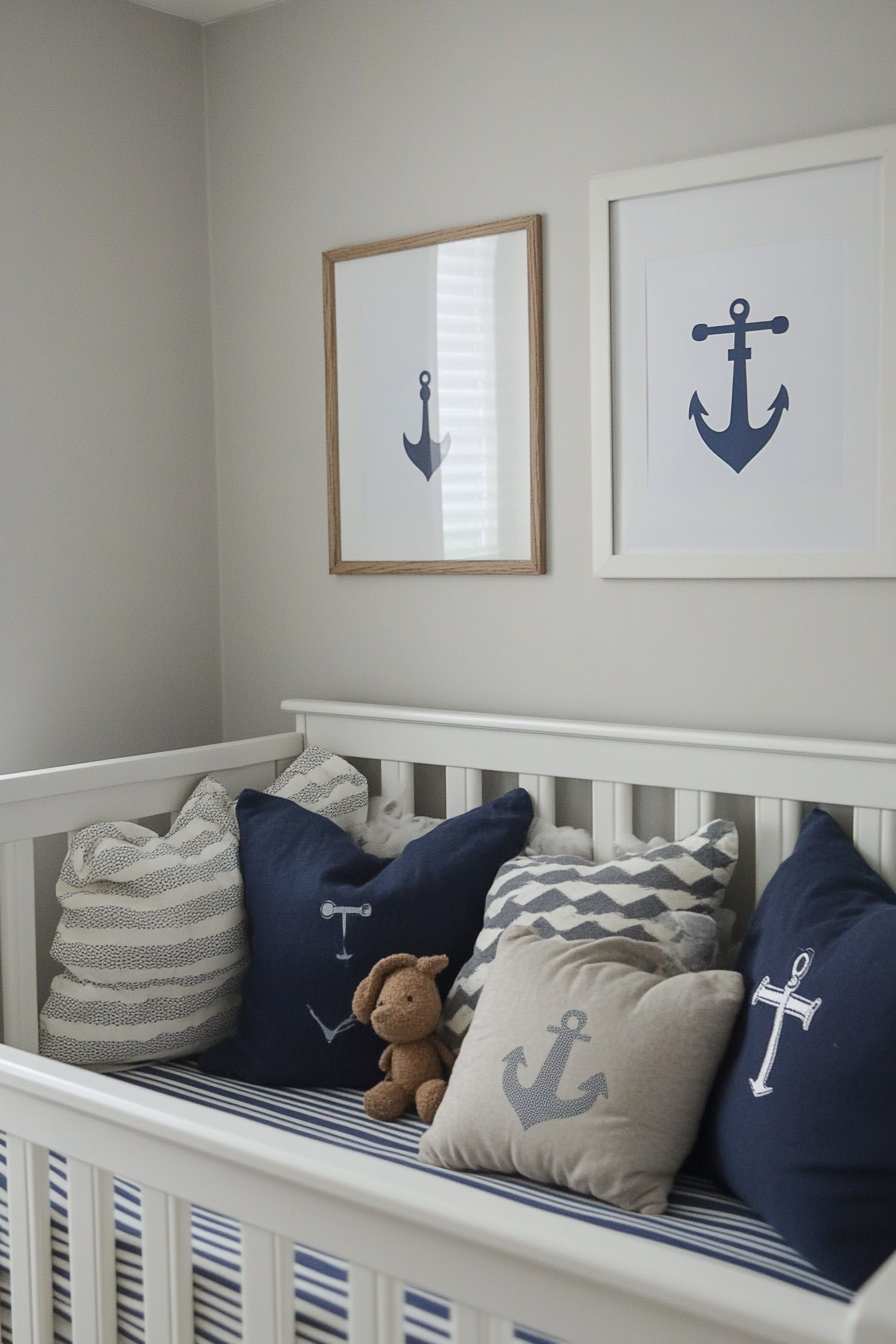
10. Nautical Theme with Stripes and Anchor Art
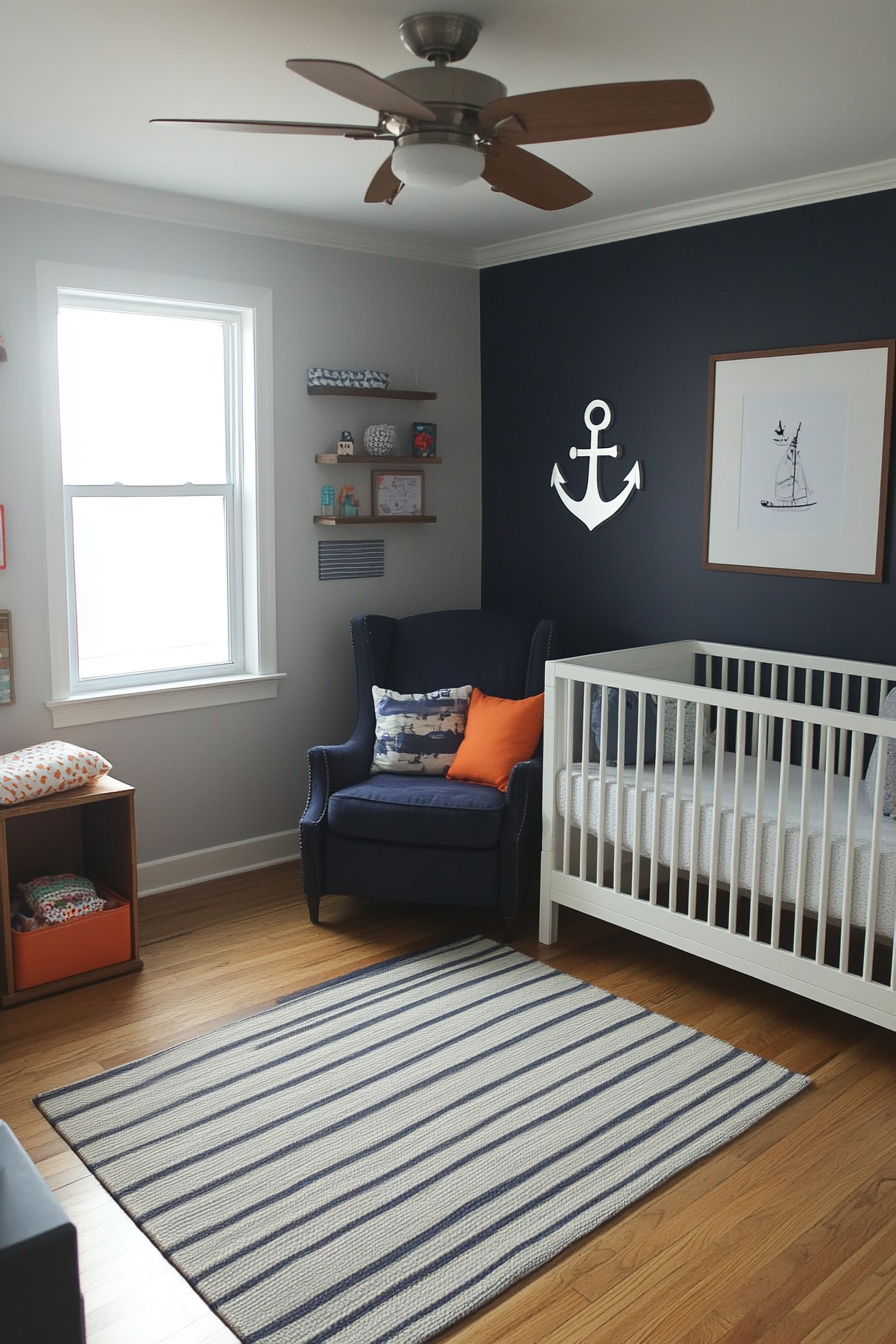
Why It Works
If you love the sea, bring that ocean-inspired energy into your nursery. Classic navy and white stripes feel crisp and clean, while anchor or whale decals add playfulness. A nautical accent wall ties in perfectly with boat-themed mobiles, rope accents, and anchor-patterned blankets. It’s a theme that can grow with your child or easily be softened with neutral decor.
How to Implement
A. Stripe Placement
- Measure Carefully: Even stripes require precise measuring and painter’s tape.
- Vary the Width: For a modern twist, try stripes of alternating thicknesses.
B. Anchor Art
- Decals or Stencils: Place a bold anchor in the center or near the crib for a focal point.
- Color Options: Navy anchors on white stripes or white anchors on navy stripes both look sharp.
C. Finishing Touches
- Rope Detailing: Add rope shelves or decorative knots for subtle nautical flair.
- Nautical Accessories: Hang a lifebuoy or display a wooden paddle if you want to go all-out.
Styling Tip
Choose wicker baskets or rope bins for toy storage to reinforce the seaside feel without adding clutter.
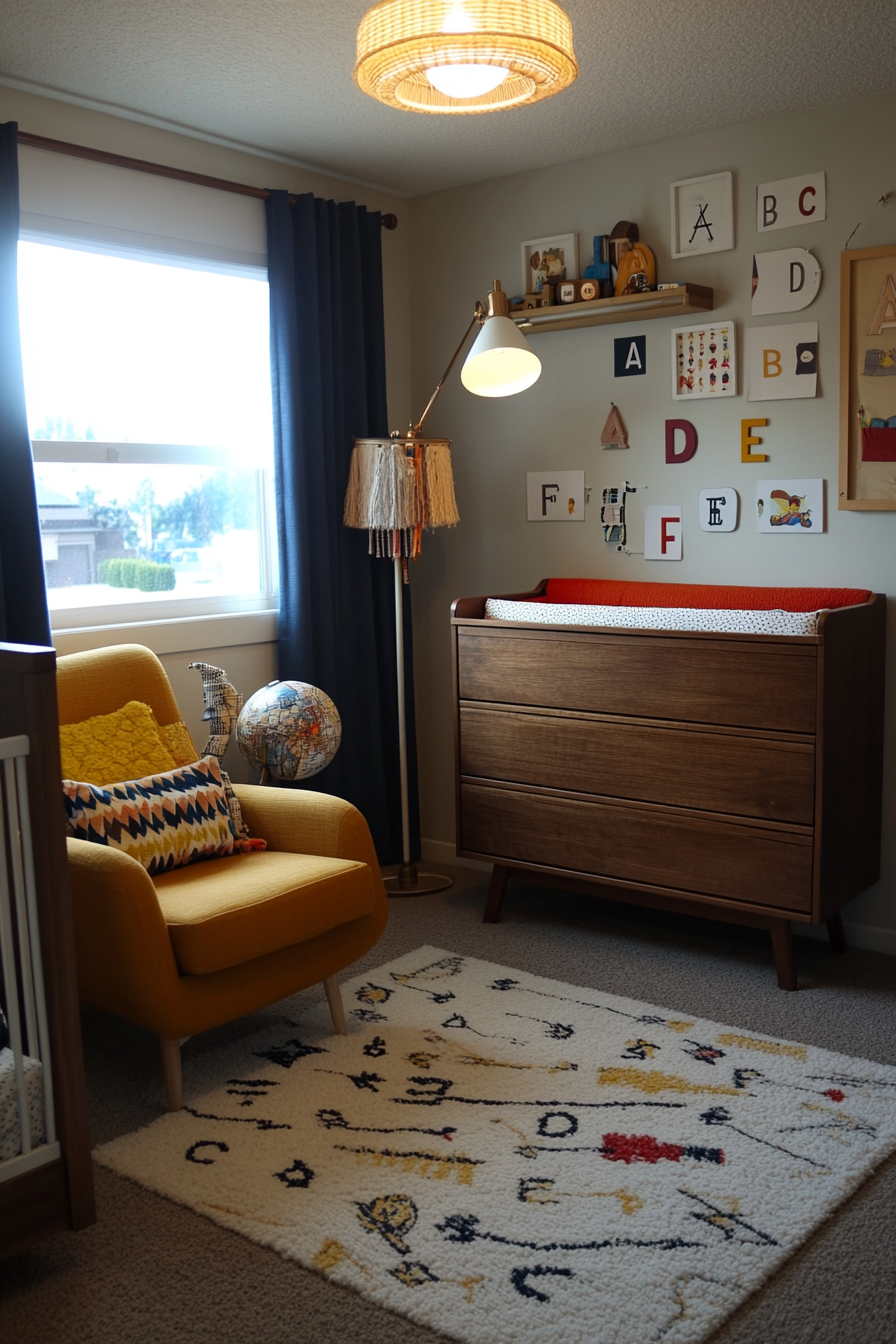
11. Alphabet Letters with Fun Educational Designs
Why It Works
Combining decor with early learning, an alphabet accent wall is both stylish and educational. Large, colorful letters stimulate visual learning and can spark curiosity as your child grows. You can make it playful by adding small pictures or icons that correspond to each letter, like an apple for A, a ball for B, etc. It’s a creative way to introduce language and reading from a very young age.
How to Implement
A. Letter Materials
- Wooden Cutouts: Paint them in bold colors or keep them natural for a rustic look.
- Decals or Stickers: Easy to apply and remove as needed.
B. Arrangement
- Organized Grid: Alphabet in rows for a cleaner, more structured appearance.
- Scattered Fun: Random placement for a playful, casual vibe.
C. Add Illustrations
- Match Letters with Images: A small icon next to each letter helps children associate words.
- Color Coding: Use coordinated colors for vowels or consonants to introduce simple phonics.
Styling Tip
Keep the rest of the wall decor minimal so the letters can be the main focus, reinforcing that learning can be fun and decorative.
12. Watercolor-Style Murals for a Whimsical Feel
Why It Works
A watercolor mural brings a dreamy, artistic flair to your nursery. Softly blended colors in a wash-like style evoke a sense of imagination and calm. This effect works well with scenes like mountains, abstract clouds, or floral motifs. It’s versatile enough to pair with modern or traditional nursery decor, and it can grow with your child as a subtle, artistic backdrop.
How to Implement
A. Pick Your Theme
- Abstract Wash: Soft gradients of pastel colors for a serene backdrop.
- Scenic Watercolor: Gently blurred edges to depict a meadow, sky, or watery landscape.
B. Technique Tips
- Wet-on-Wet: Lightly mist the wall, then blend paint for a translucent effect.
- Layer Colors: Allow each layer to dry slightly before adding more, building depth.
C. Keep It Delicate
- Use Muted Pastels: Overly vibrant hues can disrupt the soft watercolor look.
- Protect with Varnish: A clear, matte varnish can seal in the watercolor feel.
Styling Tip
Coordinate the mural with lightly textured fabrics—like gauzy curtains or a soft shag rug—to enhance the dreamy vibe.
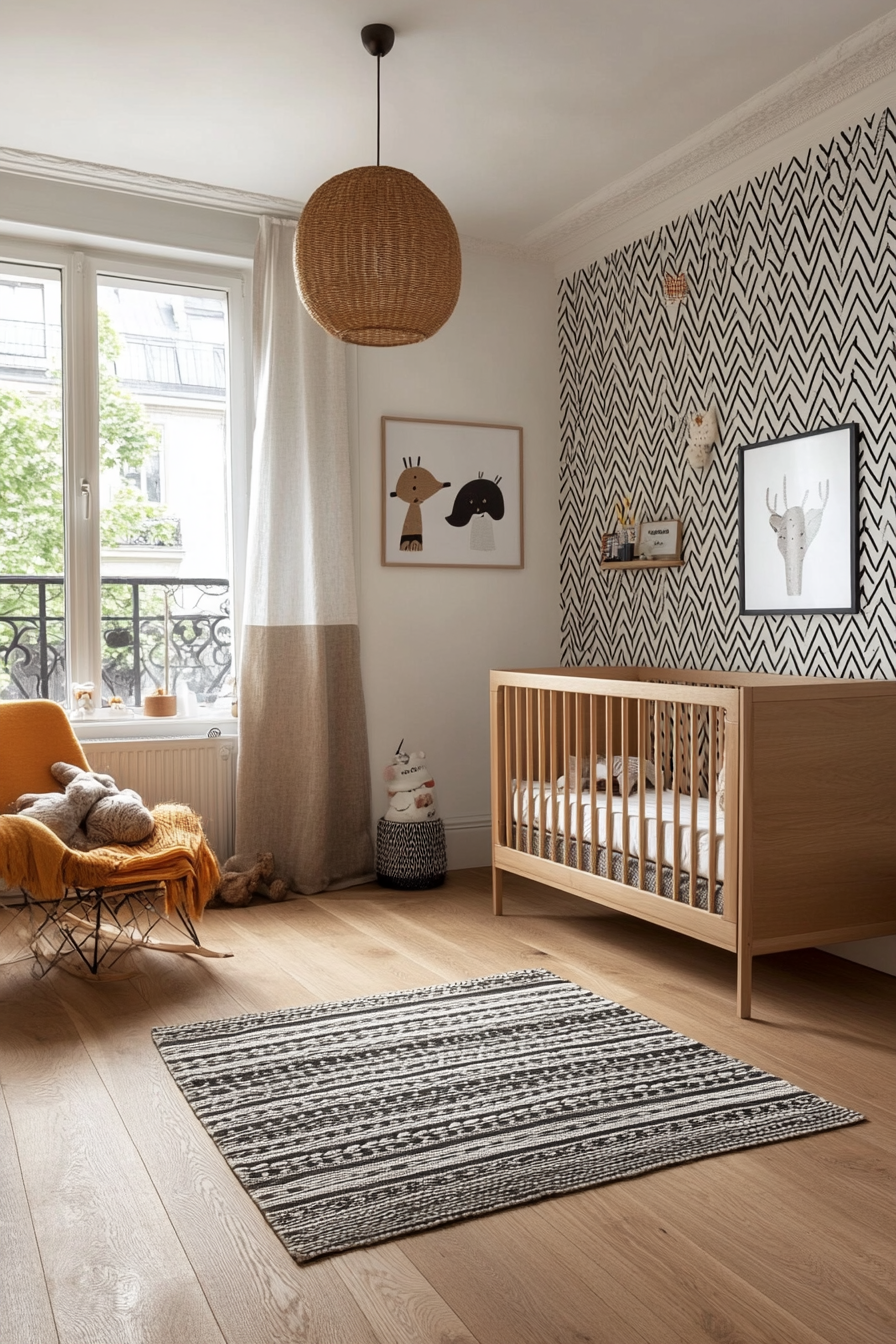
13. Scandinavian-Inspired Black-and-White Patterns
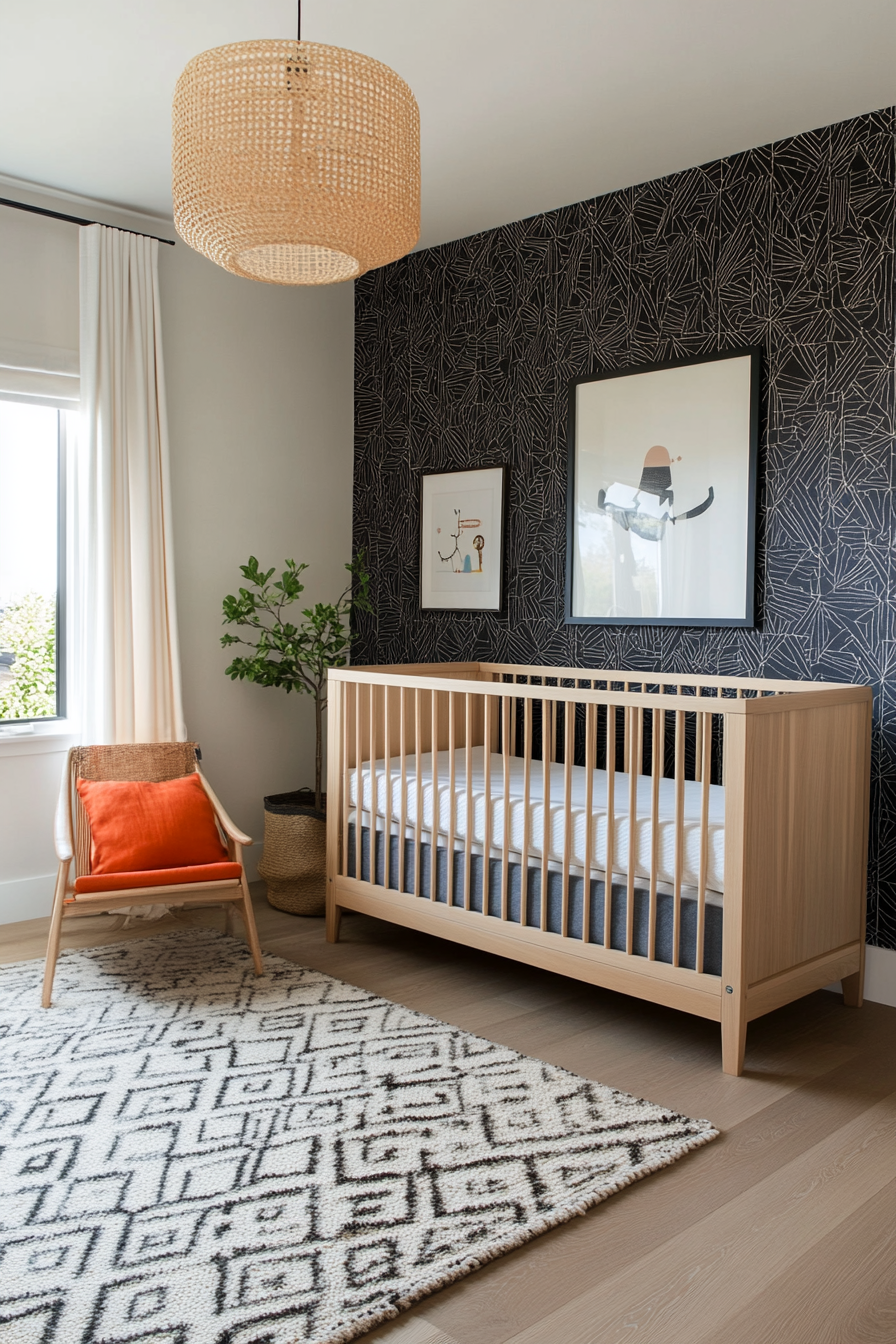
Why It Works
Scandi design is all about minimalism, functionality, and a clean aesthetic. A black-and-white patterned accent wall adds bold contrast and visual interest, especially beneficial for newborns who are attracted to high-contrast images. Whether you choose simple lines, triangles, or abstract shapes, this monochrome look can be softened with cozy textiles and warm wood accents for a comfy nursery.
How to Implement
A. Pattern Selection
- Hand-Painted vs. Decals: Decals make for an easy, uniform application; painting offers more customization.
- Repetitive or Random: Symmetrical patterns look tidy, while random shapes add a playful vibe.
B. Finishing Touches
- Neutral Furnishings: Stick to white, black, or gray furniture to maintain the crisp look.
- Add Warmth: Introduce natural wood elements or soft textiles so the room doesn’t feel stark.
C. High Contrast Benefits
- Visual Stimulation: Research shows babies respond well to high-contrast patterns.
- Grows with Child: The modern design can seamlessly transition as your toddler’s tastes evolve.
Styling Tip
Complement the black-and-white palette with a single accent color—such as mustard yellow or dusty pink—for pillows or blankets.
14. Subtle Polka Dots with Metallic Accents
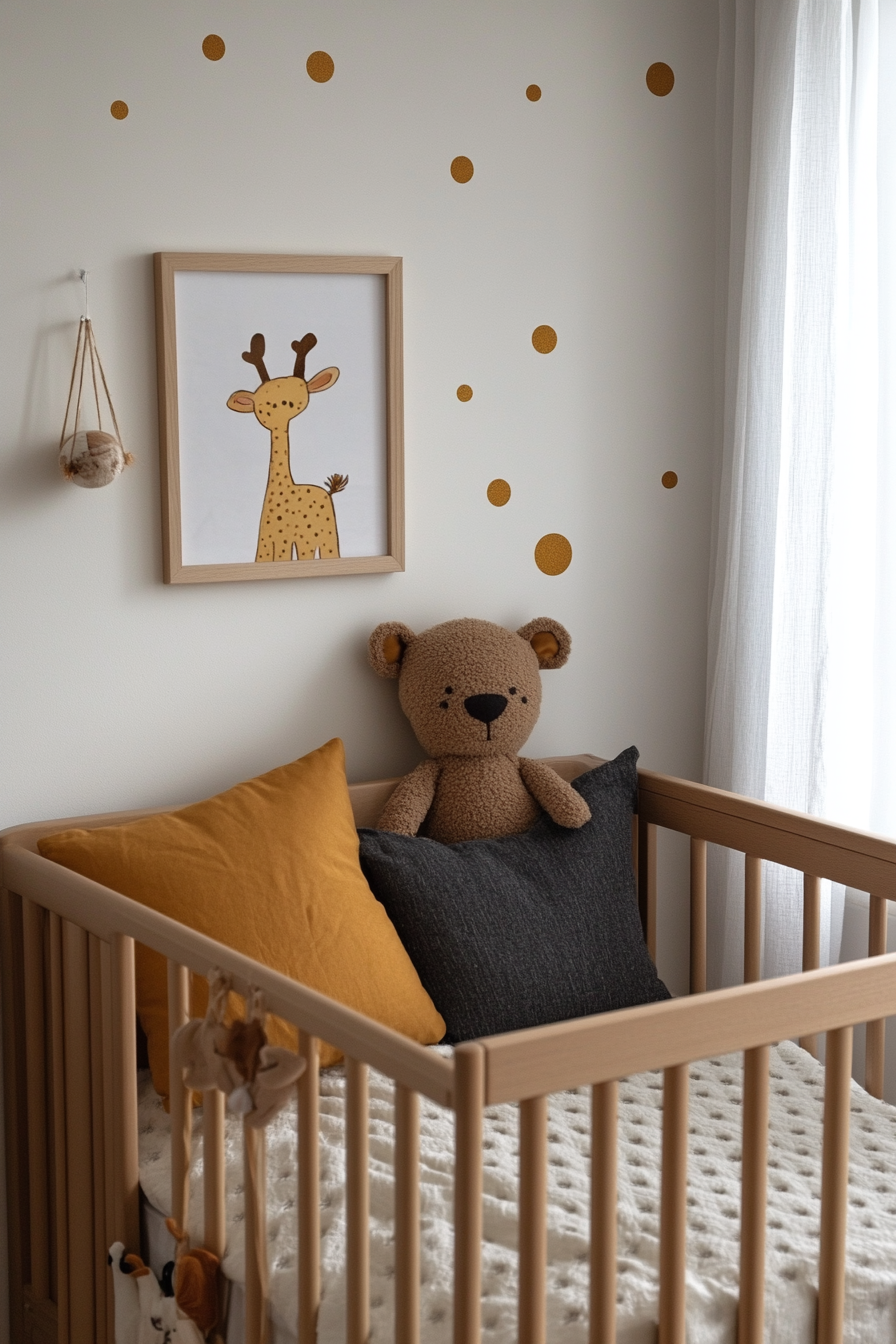
Why It Works
Polka dots add a whimsical, playful feel without overpowering the space—especially when they’re done in soft or metallic tones. The reflective qualities of metallics (gold, silver, or rose gold) can catch the light and bring a subtle sparkle to the nursery. These dots can be randomly placed, evenly spaced, or clustered for a more dynamic look, making them an easy-to-apply solution that adds instant charm.
How to Implement
A. Dot Materials
- Vinyl Stickers: Peel-and-stick dots are simple to apply and remove later.
- Stenciled Circles: Painting gives you more color and size options.
B. Placement Ideas
- Bottom Half Only: Concentrate dots around the lower part of the wall for a modern take.
- Sparse or Dense: Go light for a gentle effect or cluster more dots for extra texture.
C. Adding Metallic Touches
- Mix Finishes: Combine matte and metallic dots for subtle variety.
- Coordinate Hardware: Match doorknobs or drawer pulls in the same metallic finish for cohesion.
Styling Tip
Layer the polka dot wall with simple, solid-colored textiles so the metallic details can truly shine.

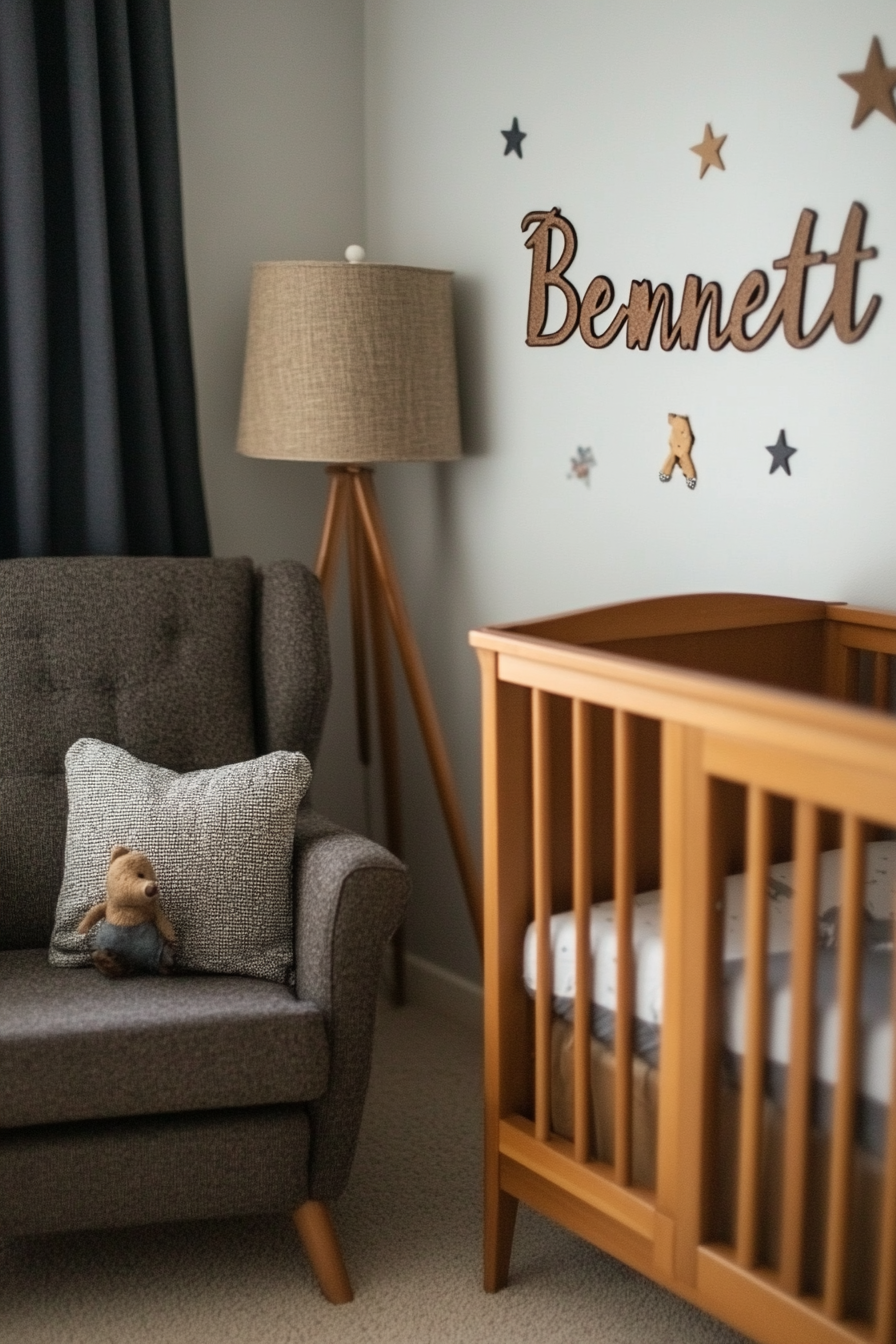
15. Personalized Name Wall with Artistic Typography
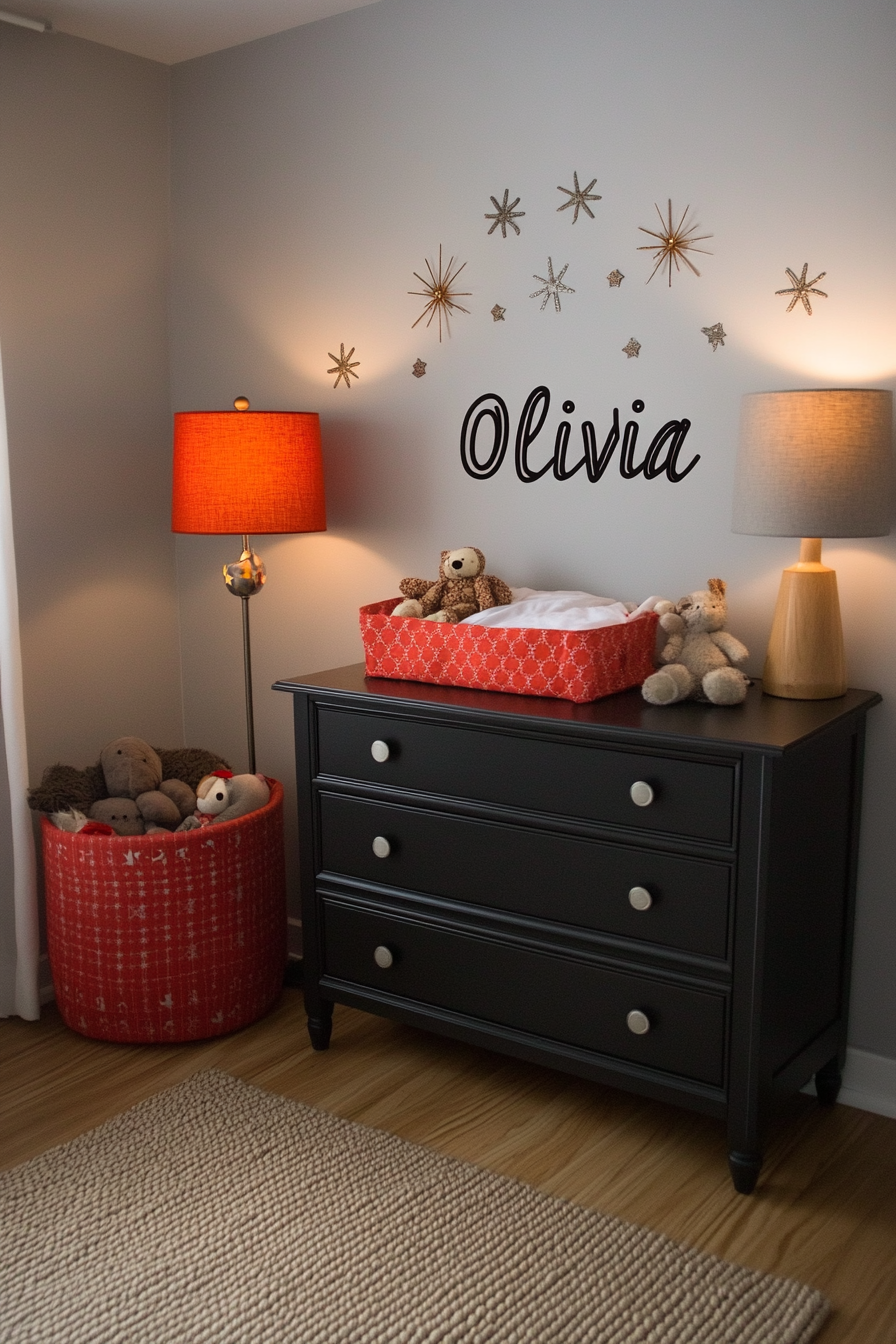
Why It Works
Celebrating your baby’s name in large, beautiful lettering makes for a heartwarming focal point. This personal touch instantly makes the nursery feel special and can be tailored to any style—whether that’s modern, rustic, or playful. Add floral accents or small motifs around the name if desired. As your child grows, it remains a cherished piece of personalized art in their space.
How to Implement
A. Typography Style
- Script or Block Letters: Curvy scripts give a soft look, while block letters feel bold and modern.
- Mixing Fonts: Combine two complementary font styles for a dynamic design.
B. Application Methods
- Wooden Letter Cutouts: Paint them or stain them to match your nursery theme.
- Stencil Painting: Create a custom stencil of your child’s name for a smooth, painted finish.
C. Supporting Elements
- Decorative Flourishes: Add small leaves, stars, or geometric shapes around the name.
- Coordinate Colors: Use a color from other parts of the room (rugs, curtains) for a unified look.
Styling Tip
Highlight the name wall with a small accent light or spotlight to draw attention to this meaningful detail, especially during bedtime stories.